
What Is the Night Swarm?
The Night Swarm is a Graveyard Incursion-exclusive boss — not a story boss upgrade, but a completely unique encounter where hundreds of bats swarm the screen at once. Instead of fighting a single giant creature, you’re fighting a living cloud of bats that splits, merges, and cycles through 5 distinct attack patterns.
Each individual bat has its own HP. Kill them and you chip away at the swarm. The problem: there are way too many to pick off one at a time. Area-of-effect weapons are essentially required.
For a full breakdown of how Incursions work, check out the Necesse Incursion Guide (coming soon).
Entry Conditions
Use the Fallen Altar to Enter the Graveyard
To fight Night Swarm, you need to enter the Graveyard Incursion via the Fallen Altar in your settlement. Place a Gateway Tablet to start — these drop from Incursion bosses and from general exploration, so you’ll naturally accumulate them as you play.
Gathering vs. Hunting — Two Routes
The Graveyard has two tablet types: Gathering and Hunting. Both can trigger Night Swarm, but the boss conditions and drops differ.
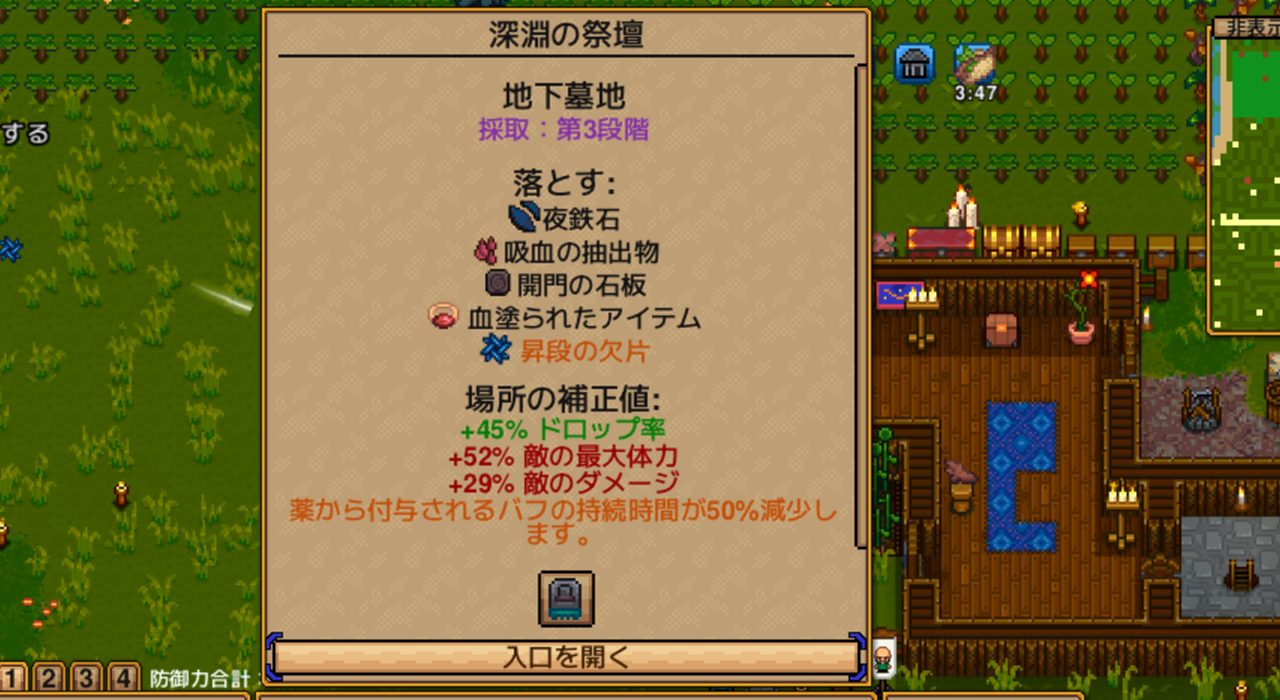
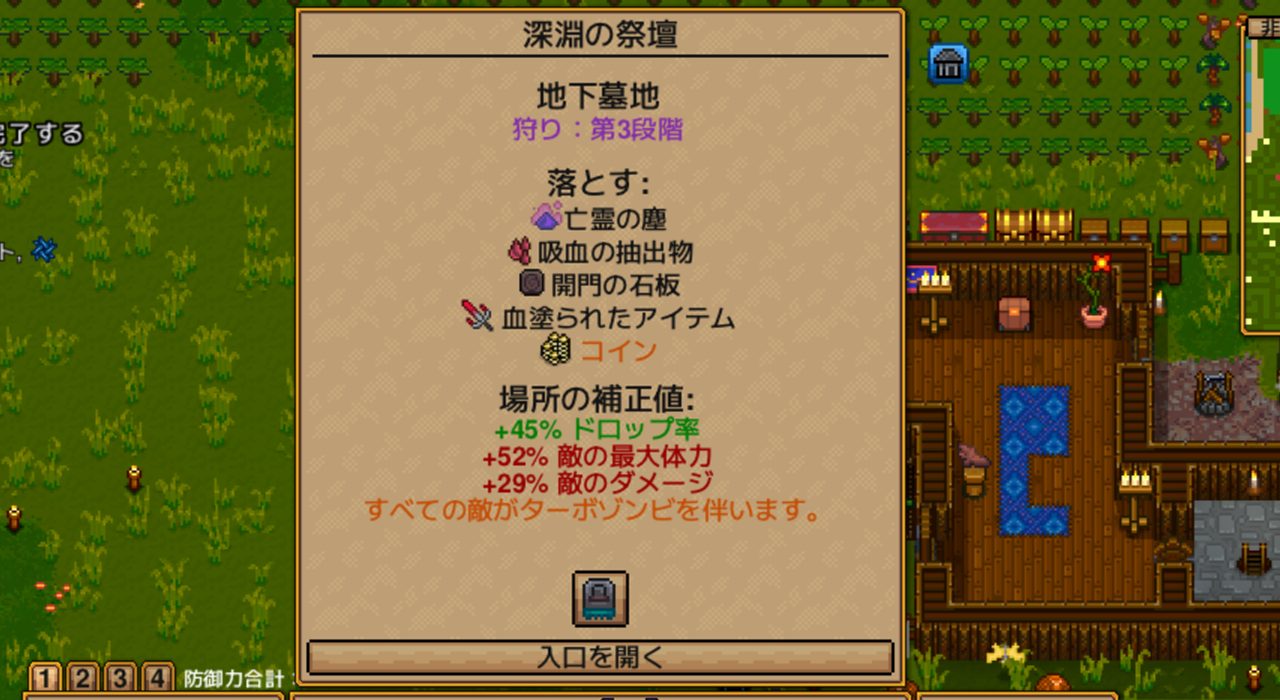
| Gathering | Hunting | |
|---|---|---|
| Boss condition | Mine ore to fill the gauge | Defeat enemies to fill the gauge |
| Exclusive drop | Nightsteel Ore | Phantom Dust |
| Shared drops | Blood Essence, Gateway Tablet, bloodstained gear | Same |
| Debuff | Potion buff duration reduced by 8% | All enemies become zombified |
Starts at Tier 3
The Graveyard Incursion appears at Tier 3 and above — I never found a Graveyard tablet below Tier 3.
At Tier 3, the following modifiers apply:
- +45% drop rate
- +52% enemy max health
- +29% enemy damage
Pre-fight Preparation
Gear Checklist (What I Used to Clear It)
| Slot | Gear | Notes |
|---|---|---|
| Armor | Slime armor set (Slime Helmet + Slime Chestplate + Slime Boots) | Total 157 armor |
| Weapon | Slime Glaive | AoE is non-negotiable — learned this the hard way on run 1 |
| Potions | Speed Potion, Superior Health Potion | Speed buff is crucial for dodging |
| Food | High-tier food | Any buff food helps |
Break the Columns First
The Graveyard has columns scattered throughout — and they become death traps when you’re running from a bat swarm. Same advice as any other Incursion: break the columns before the boss spawns. Gravestones are fine to leave, but columns will catch you mid-dodge at the worst possible moment.
Leave Your NPCs Behind
I tried bringing NPCs along on a farming run. They got wiped out instantly — there are simply too many bats for NPCs to survive. Night Swarm is a solo fight. You don’t have the attention to spare for healing them, and losing them doesn’t change the outcome anyway.
Stats
| Stat | Value |
|---|---|
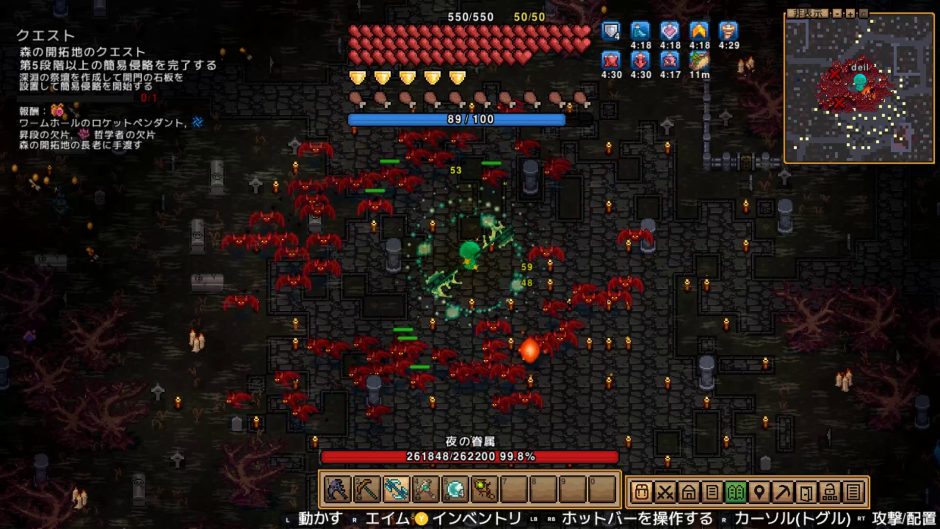
| Total HP (Classic, Tier 3) | 262,200 |
For reference, Mother Slime sits at 65,000 HP at Tier 2. This is roughly 4× that — and you’re dealing with the Tier 3 +52% health modifier on top. The raw HP is lower, but this is still a serious war of attrition. AoE hits multiple bats simultaneously, which is the only way to make it manageable.
Attack Patterns & How to Dodge
Pattern Overview
Night Swarm cycles through 5 patterns in order. Every pattern is some variation of “bats form a formation and rush you.” None of them are hard to dodge in isolation — the danger is getting caught mid-pattern and taking continuous chip damage. If you get trapped, your HP evaporates fast.
Priority rule: always break out of the swarm before anything else.
Pattern 1: Two-Group Spiral
The swarm splits into 2 groups and spirals around you at high speed. Direct damage only happens on contact, but the speed makes it easy to get clipped.
How to dodge: Move away from the spiral’s path in a wide arc. Once the groups start orbiting, don’t try to cut through — go around the outside and give yourself room to breathe.
Pattern 2: Three-Group Triangle Charge
The swarm divides into 3 groups, forms a triangle, then all three charge inward simultaneously — repeated twice. If you’re standing near the center of the triangle, you catch all three hits at once.
How to dodge: Get outside the triangle before the charge. As soon as you see the groups forming that triangular spread, move toward one of the outer edges. Being caught in the middle is the trap.
Pattern 3: Four-Group Charge
Four groups charge from four directions at once — a harder version of Pattern 2. One more direction means the safe zone gets significantly smaller.
How to dodge: Same principle as Pattern 2: get to the outside. You need to read the formation faster since there’s less room to work with.
Pattern 4: Encirclement Rush
The swarm surrounds you in a ring, then individual bats take turns charging straight at you one by one. You can actually hit the incoming bats as they approach.
Counter play: This is your damage window. Use a weapon with reach like the Slime Glaive to intercept each bat as it comes in. They’re predictable, the timing is consistent, and you can rack up damage without taking hits. If you’re struggling elsewhere, use the health potions here.
Pattern 5: Grid Formation Charge
The swarm aligns into a grid pattern — rows and columns — then charges all at once. The gaps between rows are your safe zones.
How to dodge: Find a gap between rows and stand in it before the charge. Once the grid forms, identify the nearest gap and step into it. The charge is fast, so positioning before it fires is the key.
Strategy Summary
[Early fight — large swarm] Observe the 5-pattern cycle, learn the timing Hit multiple bats with AoE to chip HP efficiently Wide open space is mandatory — break columns first
[Mid to late — attrition phase] Dodging stays manageable, but getting caught hurts badly Use Pattern 4 (encirclement) as your healing window Stay calm, maintain distance, keep grinding HP down
[Key factors for success] ① AoE weapon required — Slime Glaive confirmed ② Break columns before the fight ③ When caught in the swarm, disengage immediately
First-hand Experience
Run 1: Slime armor — Wiped at 66% boss HP remaining
I went in right after finishing Mother Slime, Slime armor equipped but with a single-target weapon. Couldn’t touch the swarm fast enough. Dodging was workable, but every time I got clipped by a pattern, the continuous damage tore through my HP. Dealt 34% of the boss’s health and hit a wall. Single-target does not work against a bat cloud.
Run 2: Swapped to Slime Glaive — Victory
Changed nothing except the weapon. The Slime Glaive’s wide swing hits multiple bats per attack, which completely changed the DPS equation. Pattern 4 (encirclement) was now easy to counter — just swing as they come in. The fight turned into a long grind, but I had enough potions to outlast it.
I tried NPCs on a later farm run. They were completely overrun — bats everywhere, NPCs couldn’t dodge, all dead within seconds. Solo with AoE is the correct approach.
Drop Items
No Elder reward since this is an Incursion boss, not a story boss. Drops vary by tablet type.
Shared Drops
| Item | Type | Notes | |
|---|---|---|---|
| Blood Essence | Crafting material | Tier 2 essence. Required for Nightsteel gear | |
| Gateway Tablet | Consumable | Entry key for the next Incursion | |
| Bloodstained gear | Random equipment | Graveyard-exclusive weapons and accessories |
Gathering Route Only
| Item | Type | Notes | |
|---|---|---|---|
| Nightsteel Ore | Crafting material | Gathering only. Required for Nightsteel gear |
Hunting Route Only
| Item | Type | Notes | |
|---|---|---|---|
| Phantom Dust | Crafting material | Hunting only. Required for Nightsteel gear |
Enemy Drops (Graveyard Mobs)
These drop from regular Graveyard enemies (vampire and bat types) — not boss-exclusive. You can get these without killing Night Swarm.
| Item | Type | Stats | |
|---|---|---|---|
| Blood Claw | Melee weapon | Haven’t personally obtained it, but confirmed to exist | |
| The Crimson Sky | Bow | 148 ranged damage, 2.3 attack speed. Alt-fire: shoots 5 arrows at once at the cost of 10 HP | |
| Blood Grimoire | Magic weapon | 159 magic damage, 5% crit. Marks enemies and hits them with a damage beam | |
| Bloodstone Ring | Accessory | -20 armor, gain 4 HP regen/sec while below 50% HP |
What to Do After
1. Craft the Nightsteel Armor Set
Blood Essence, Nightsteel Ore, and Phantom Dust are the crafting materials for the Nightsteel armor set. You need both Gathering and Hunting routes cleared to get all required materials.
2. Farm Mob Drops
The enemy drops (The Crimson Sky, Blood Grimoire, etc.) don’t require you to kill Night Swarm — just survive long enough for mobs to drop them. The Crimson Sky in particular is a strong AoE ranged weapon that makes future Night Swarm runs easier.
3. Move to Other Incursion Biomes
The Graveyard is one of several Incursion zones. Others include the Slime Cave, Swamp, Forest, Desert, and Snow Biome — work through whichever tablets you have.
4. Push to Higher Tiers
Once your gear is upgraded, return to the Graveyard at higher Tiers. HP and damage scale up significantly, but so do the rewards.
FAQ
Q1: Where does Night Swarm appear?
A: In the Graveyard Incursion only — an Incursion-exclusive boss. Use the Fallen Altar with a Gateway Tablet, then complete Gathering or Hunting objectives until the boss spawns. Confirmed from Tier 3 onward.
Q2: Can you beat it with single-target weapons?
A: Technically yes, but it’s extremely inefficient. My first run with a mostly single-target weapon ended with 66% boss HP remaining and a wipe. The Slime Glaive (or another AoE weapon) is effectively required. The Crimson Sky (5-arrow burst from mob drops) also works well.
Q3: Should you bring NPCs?
A: No. I tried it — the bat volume overwhelms NPCs immediately. They die without contributing meaningfully, and you spend the fight worrying about them instead of dodging. Solo AoE is the correct strategy.
Summary
- Night Swarm is a Graveyard Incursion-exclusive boss — appears at Tier 3 and higher
- Enter via the Fallen Altar using a Gathering or Hunting Gateway Tablet
- HP: 262,200 (Classic, Tier 3) — expect a long fight
- 5 attack patterns cycle in order: Two-group spiral → Triangle charge → Four-group charge → Encirclement rush → Grid formation rush
- AoE weapon is non-negotiable — Slime Glaive confirmed effective
- Break the Graveyard columns before the fight
- Go solo — NPCs get overwhelmed
- Drops: Blood Essence (shared), Nightsteel Ore (Gathering), Phantom Dust (Hunting) → craft the full Nightsteel armor set
- Mob drops include The Crimson Sky, Blood Grimoire, and Bloodstone Ring
Related Articles
| Article | Link |
|---|---|
| Necesse Incursion Guide | Coming soon |
| Mother Slime Boss Guide | Guide |
| Complete Guide Index | Boss order & all articles |
| Fallen Wizard Boss Guide | Guide |
Boss Navigation
| Previous Boss | Index | Next Boss |
|---|---|---|
| ← Mother Slime | Complete Guide | Spider Empress → |
Published: 2026-05-24
Verified on: Necesse v1.0 (PC), Classic difficulty, Solo