
Sage and Grit are the fifth and final Tier 3 boss in Necesse — the last fight the Elder sends you on before the endgame opens up. You summon them deep in the Desert Biome underground by using Dragon Souls on the temple pedestal. This is the game’s first dual-boss encounter: a gold dragon and a blue dragon attack simultaneously, circling you in constant rotation. I cleared the first run with Ancient Fossil armor and the Swamp Dweller Staff, then wiped on a farming run when one dragon died early and the survivor went berserk. Defeat both dragons at the same time — that’s the one rule that decides whether you win or lose this fight.
What Are Sage and Grit?
Sage and Grit are Tier 3 Boss #5 (final) and the 12th boss overall. The Elder assigns them after you defeat the Pest Warden.
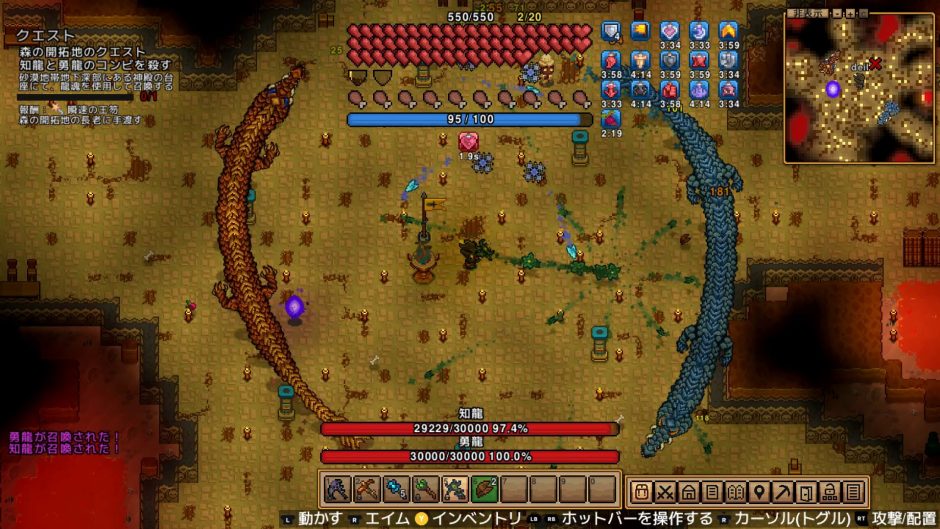
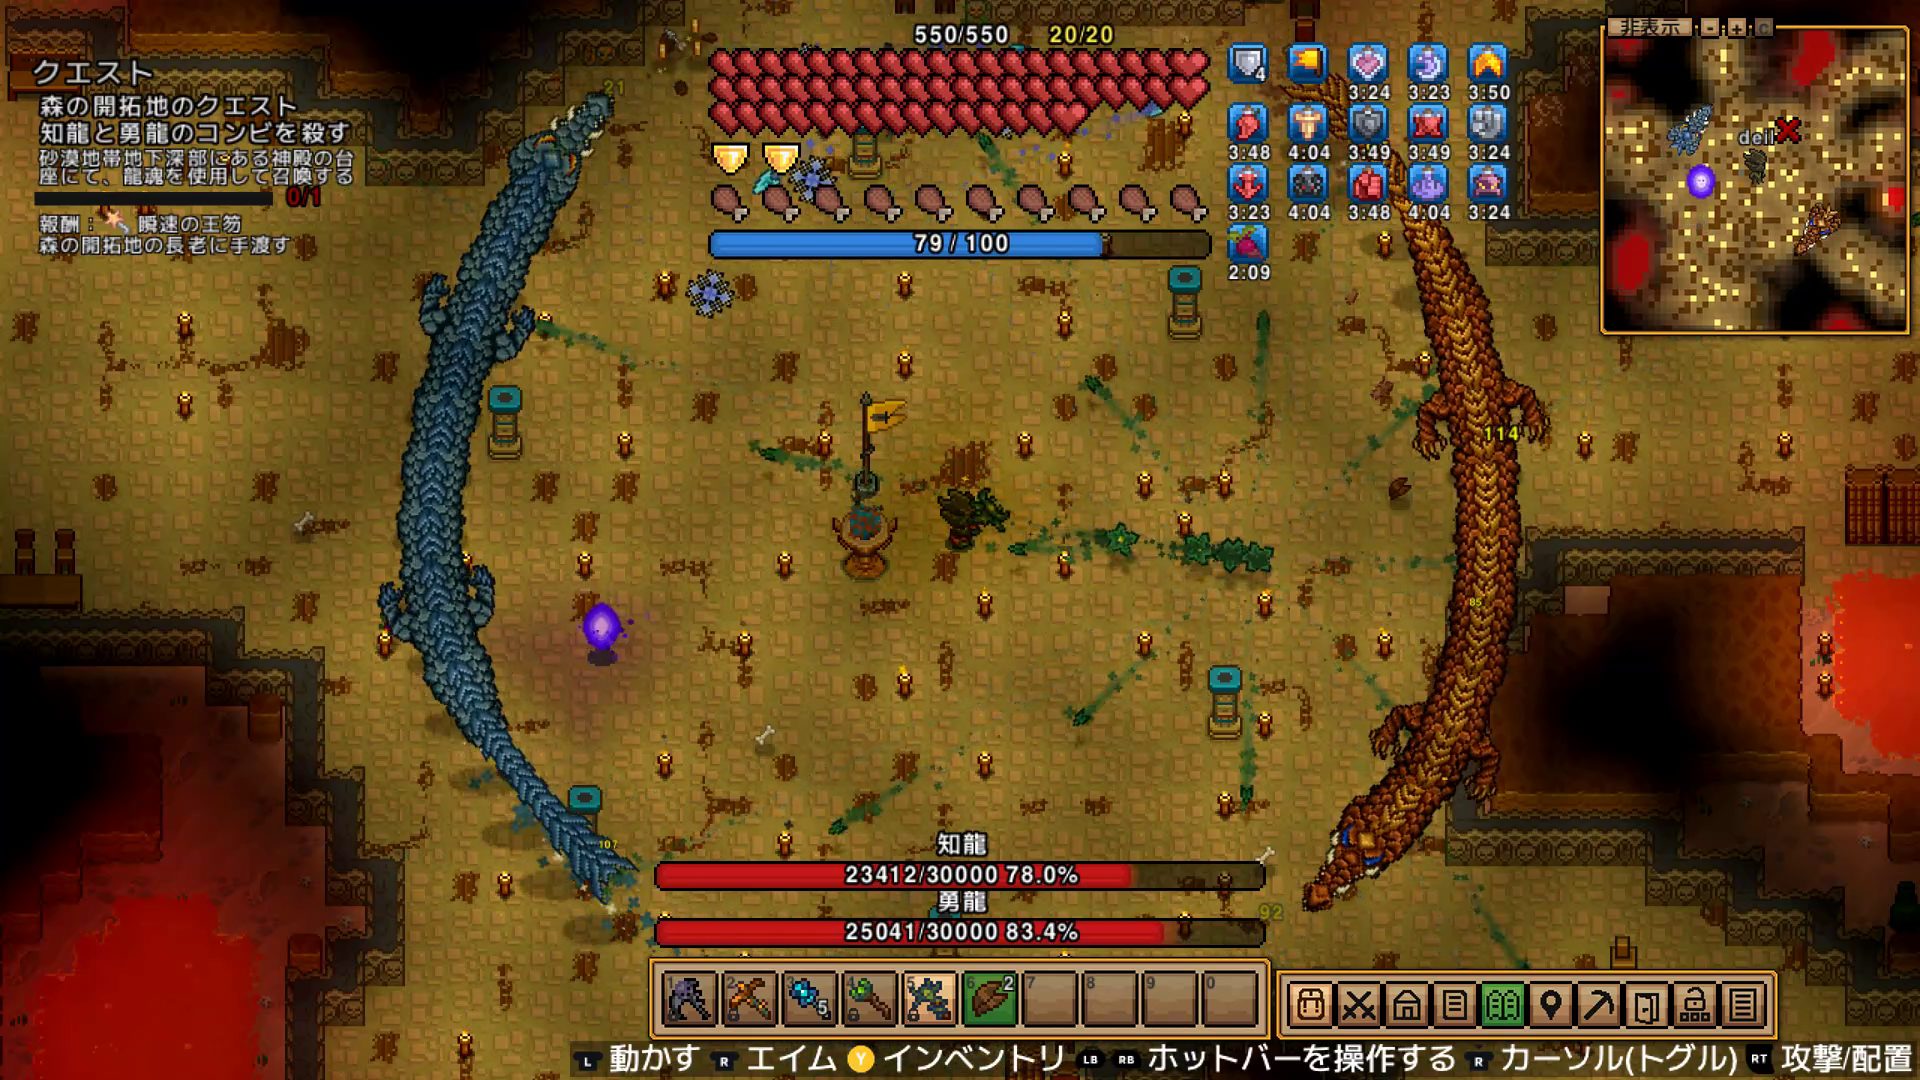
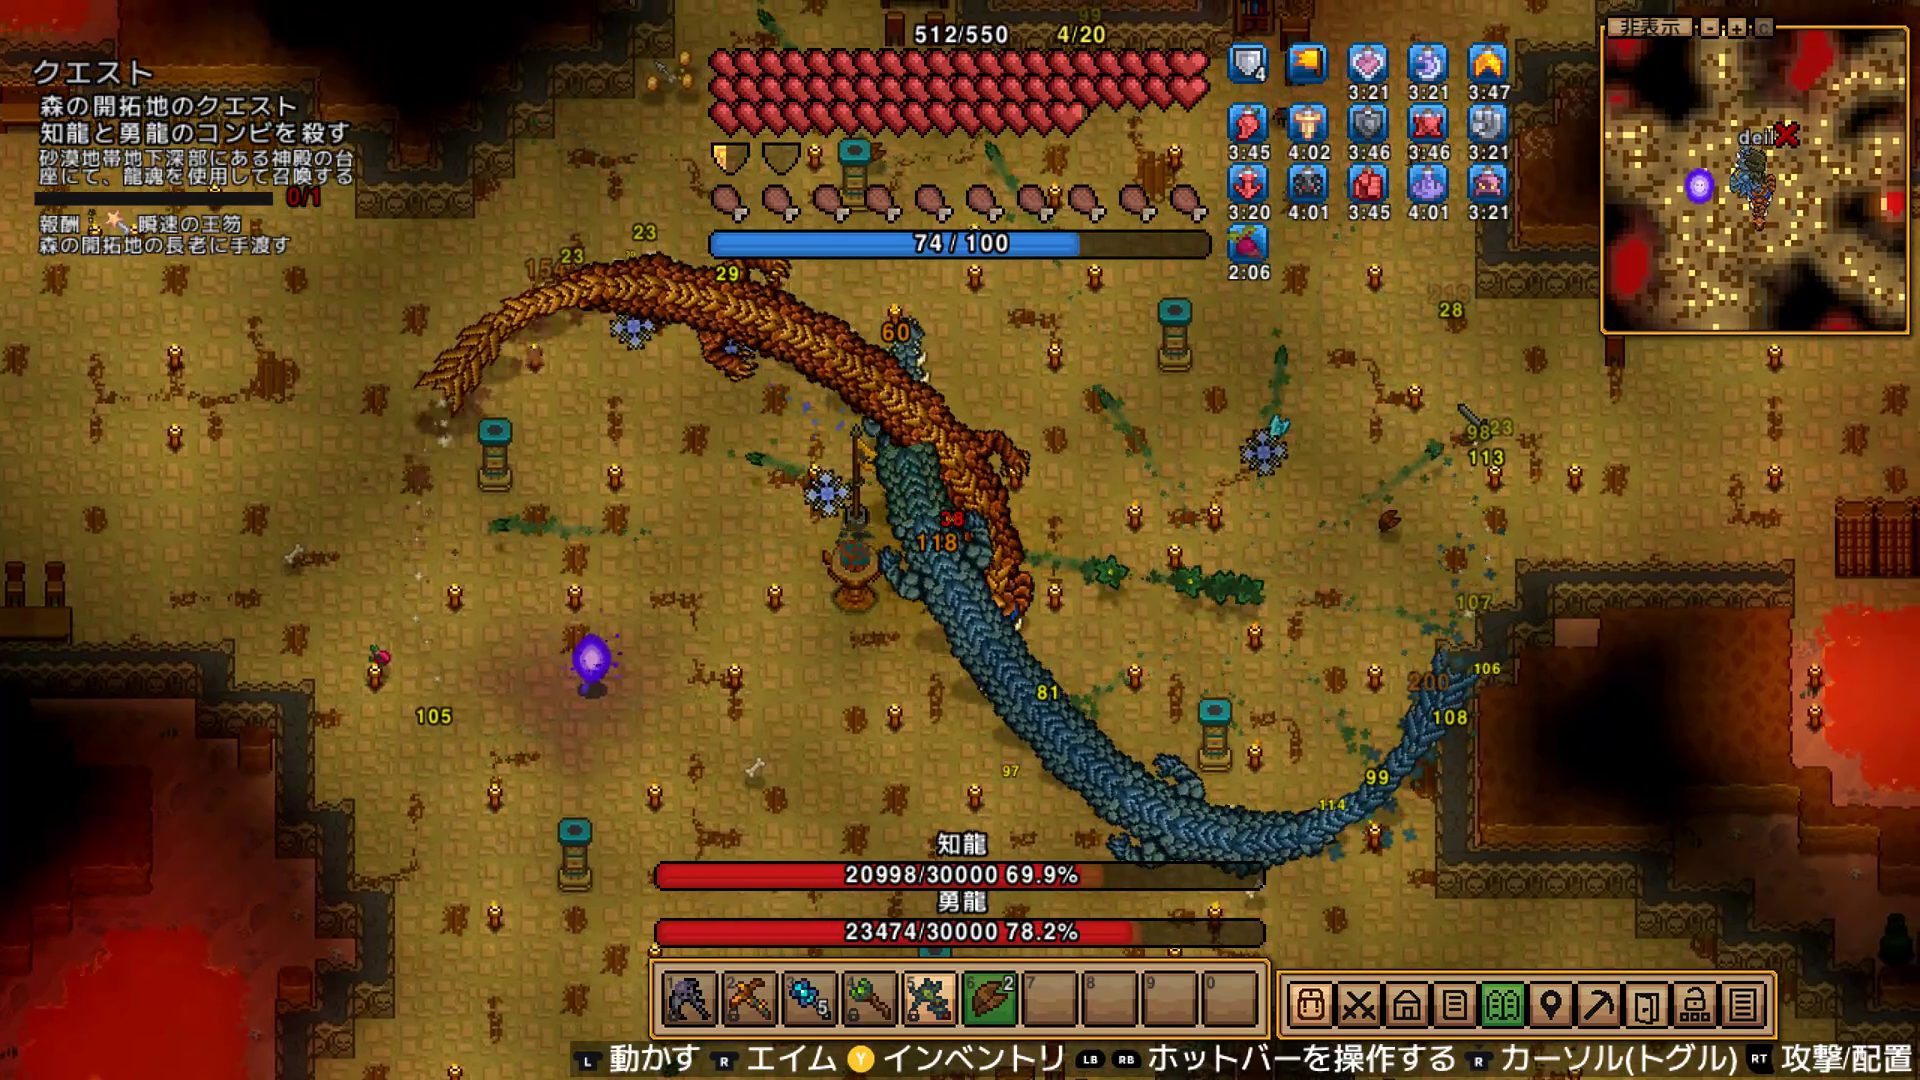
The fight takes place deep in the Desert Biome underground. This is Necesse’s first dual-boss encounter: the golden Sage and the blue Grit spawn together and spend the entire fight circling you in coordinated patterns. They share the worm-type body with Pest Warden, but two bosses circling and attacking simultaneously makes this a completely different challenge.
The defining mechanic is the berserk state: kill one dragon before the other and the survivor enters a frenzy — dramatically faster and more frequent charges. I triggered this on a farming run and lost. Keeping damage balanced between both dragons throughout the fight is non-negotiable.
Defeating them unlocks the desert temple and opens the path to the final boss. Sage and Grit are the gate to the endgame.
Dragon Souls: How to Obtain and Summon
Getting Dragon Souls
Dragon Souls are the summoning item for Sage and Grit. You find them while exploring the Desert Biome deep underground.
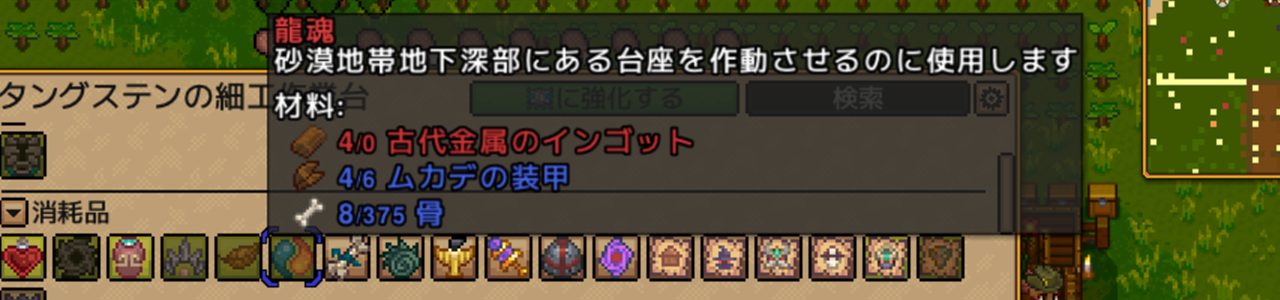
The in-game description: “Used to activate a pedestal in deep desert caves.”
Summon Location
Use Dragon Souls on the temple pedestal in the Desert Biome deep underground. The pedestal sits in an open area where cave ruins intersect.
Before You Summon
Break any pillars around the pedestal. The area is naturally open — no arena building needed. Just clear the pillars that could block your movement mid-fight.
Gear Checklist
What I Used for My First Clear
| Slot | My Gear | Notes |
|---|---|---|
| Armor | Ancient Fossil set (Melee) | 120 total defense. Upgraded from Dryad armor (110) after Pest Warden |
| Magic weapon | Swamp Dweller Staff | Main damage. Split projectiles naturally spread to both dragons |
| Summoner weapon | Cryo Staff | Minion auto-attacks while I focus on dodging |
| Potions | Greater Health Potions, stat buffs | Full buffs before the pull |
| Food | High-tier cooked food | Pre-fight buff food |
Upgraded from Dryad armor (110 defense) to Ancient Fossil armor (120 defense) after finishing Pest Warden. A well-rolled Swamp Dweller Staff from Pest Warden’s drops became my main weapon — its split projectiles reach both dragons simultaneously without any extra effort.
Why Piercing Weapons Underperform Here
Some guides recommend piercing weapons, but in practice the two dragons almost never overlap — they’re constantly circling on opposite sides of you. I had very few moments where a piercing attack could hit both at once. Swamp Dweller Staff’s split projectiles scatter wide and reach both dragons far more consistently.
Arena Setup
None needed. The pedestal area is already an open space. Just break the surrounding pillars.
Stats
| Stat | Value |
|---|---|
| HP (Classic) | 30,000 each (60,000 total) |
Total HP is higher than Pest Warden (45,000), but each dragon only has 30,000 — manageable if you spread damage evenly. The real danger isn’t their raw HP; it’s accidentally over-focusing one dragon and triggering the berserk state. Watch both HP bars throughout the fight.
Attack Patterns and How to Dodge
General Pattern
Sage and Grit attack on a repeating cycle: circling → charge → flame beam → repeat. During the circling phase they deal no damage at all — it’s your biggest sustained damage window.
Pattern 1: Circling (Your Attack Window)
Both dragons orbit around you. They deal zero damage unless you walk directly into them. Stay calm and go all-out with spells and melee. This is the best free damage phase in the entire fight.
Pattern 2: Charge
After circling, both dragons charge straight at you. Block with a shield or dash to dodge. They can chain multiple charges in a row — don’t drop your guard after the first one.
Pattern 3: Flame Beam
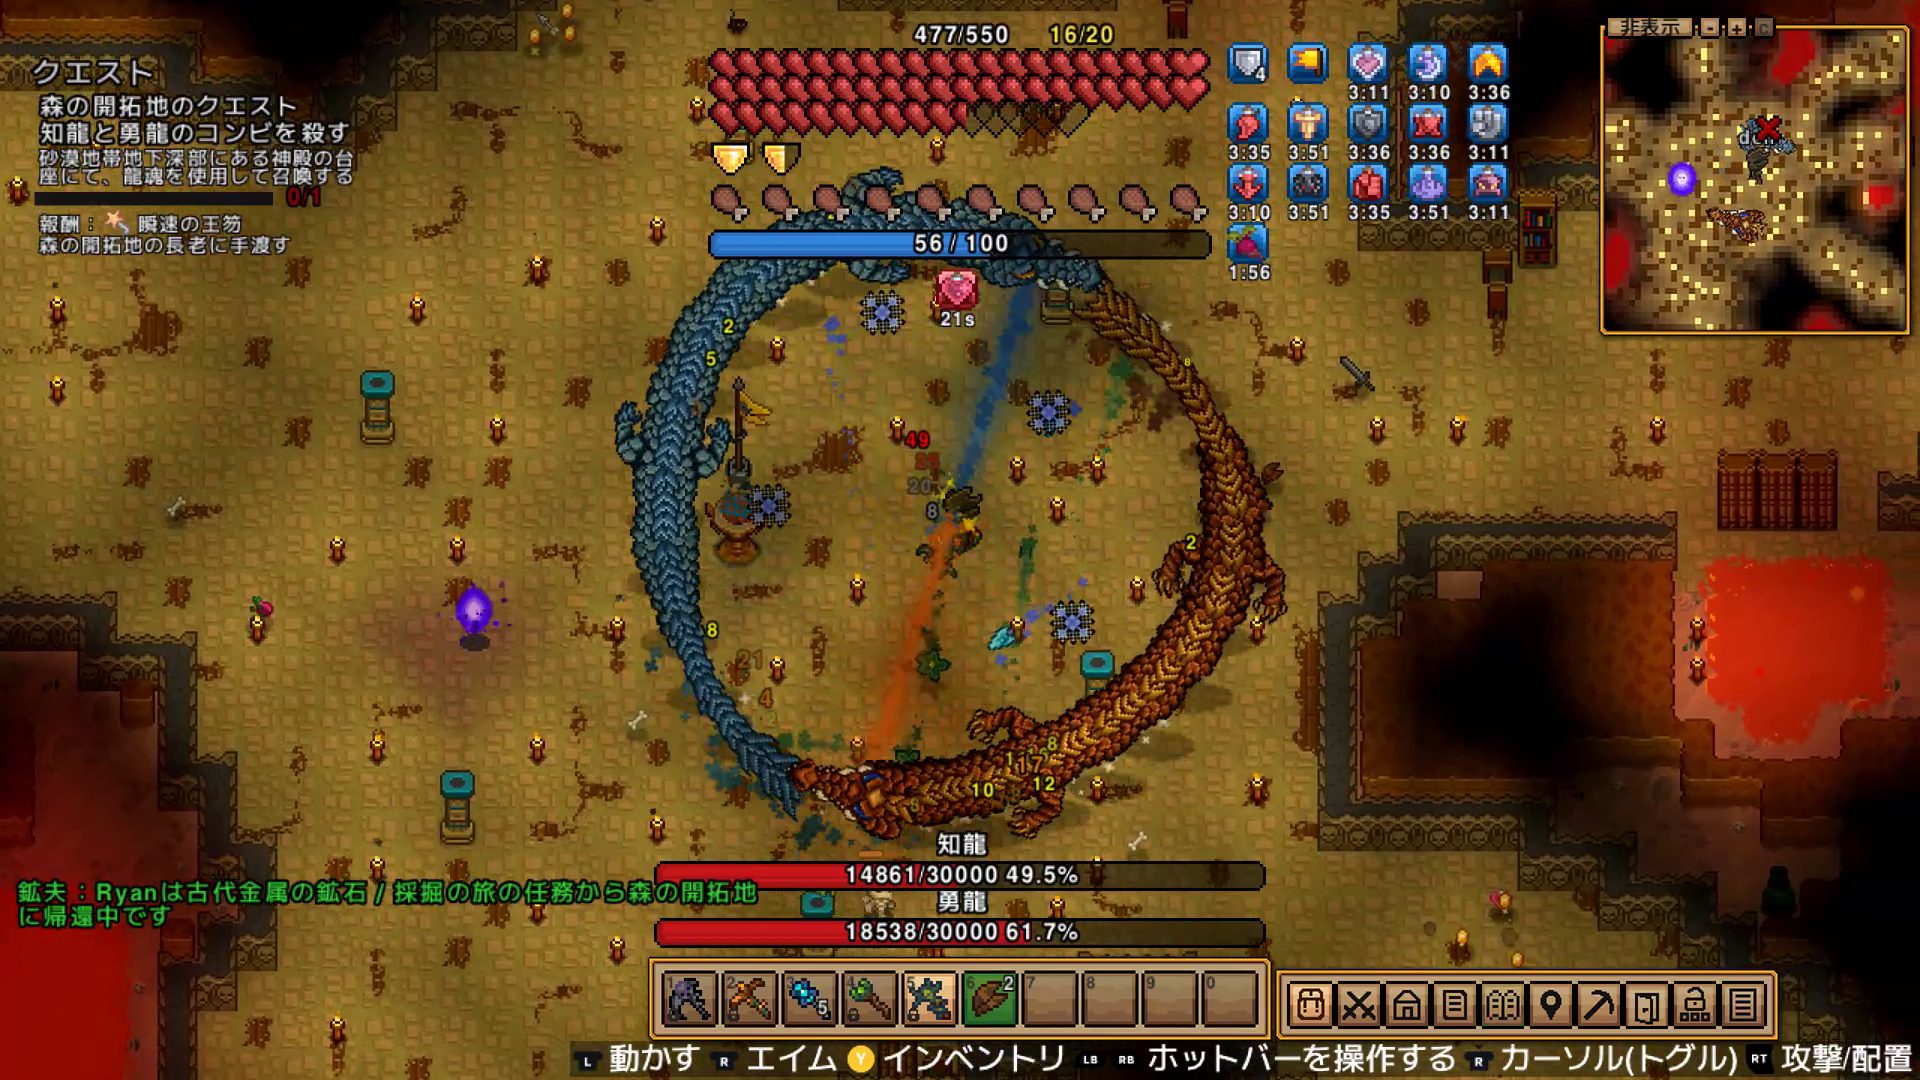
The two dragons position on opposite sides of you and fire a flame beam between their heads. The most dangerous and distinctive attack in this fight. Dodge by staying toward the center and rotating in the same direction as the dragons. Moving outward puts you straight into the beam’s sweep.
Berserk State (One Dragon Killed Early)
Kill one dragon before the other and the survivor goes berserk — charge speed and frequency spike to a level that’s extremely hard to keep up with. I experienced this on my second run and got wiped. Defeat both dragons simultaneously. That’s the core challenge.
Strategy at a Glance
[Core Cycle] Circling → Charge → Flame Beam → repeat Circling: zero attacks from dragons. Go full damage. Charge: shield block or dash dodge. Watch for chains. Flame Beam: stay center, rotate with the dragons.
[Most Important] Keep HP even across both dragons One dying early = berserk = almost certain wipe. Check HP bars constantly and redirect focus to whoever is ahead. Split-projectile magic (Swamp Dweller Staff etc.) helps spread damage naturally.
[Key Points] 1. Aim for a simultaneous kill — avoid berserk at all costs 2. Split-projectile magic > piercing (dragons rarely overlap) 3. Circling = maximum damage window. Pure defense during charge and beam.
My Runs
Run 1: Ancient Fossil + Swamp Dweller Staff → Clear (Barely)
Went in with full Ancient Fossil armor (120 defense) and a well-rolled Swamp Dweller Staff from Pest Warden farming. The Staff’s split projectiles spread to both dragons without me having to think about it, keeping their HP roughly even throughout. It got close near the end, but full buffs and Greater Health Potions kept me alive long enough to push through.
Run 2: Farming Run → Berserk Wipe
On the second run, one dragon died just slightly ahead of the other. The survivor went berserk and the charge spam became impossible to handle. Even split-projectile magic lets HP drift — check the bars and consciously switch to the healthier dragon when they start diverging.
Drops
Elder Quest Reward (First Clear Only)

| Item | Effect | |
|---|---|---|
| Blink Scepter | Ability trinket. Equip and press the trinket ability button to blink forward instantly |
The Blink Scepter is a dash-type ability trinket — useful for combat dodging and exploration movement alike.
Random Drops (One of Four Weapons)
Sage and Grit drop one weapon at random per kill.
| Item | Type | Stats | |
|---|---|---|---|
| Bow of Dualism | Ranged | 63 ranged damage, 2.6 attack speed, +1 durability, 25% crit. Shoots 2 projectiles at once | |
| Dragon Lance | Magic | 27 magic damage, +1 durability, 30% crit, 10 fortification. Creates a lance of fire | |
| Dragons Rebound | Throwing | Throwing weapon. 4.5 attack speed | |
| Skeleton Staff | Summoner | 28 summon damage, 30% crit. Can direct targets, summons a pair of skeletons |
Bow of Dualism fires two projectiles per shot with 25% crit — the best ranged weapon at this tier. Skeleton Staff summons two directable skeletons, the natural next step for summoner builds.
What to Do After Beating Sage and Grit
1. Collect the Blink Scepter from the Elder
Return to your settlement and talk to the Elder to receive the Blink Scepter. Equip it as a trinket and use it for instant-dash mobility in both combat and exploration.
2. Test Your Drop Weapons
If you got a random drop, try it against your current build. Bow of Dualism is a top pick for ranged builds; Skeleton Staff is the clear upgrade for summoner builds.
3. Head to the Desert Temple
Defeating Sage and Grit unlocks the desert temple. With a full Tier 3 clear behind you, you should be ready to take on the final boss. This is the entrance to the endgame.
FAQ
Q1: Can’t find or spawn Sage and Grit
A: You need Dragon Souls — found while exploring the Desert Biome deep underground. Use them on the temple pedestal in the deep desert caves. The pedestal is in an open area where cave ruins intersect.
Q2: One dragon keeps dying before the other
A: If one goes down first, the other berserks and becomes very hard to deal with. The Swamp Dweller Staff’s split projectiles spread damage naturally, but drift still happens. Watch both HP bars and consciously redirect damage to the healthier dragon whenever they start to diverge.
Q3: Can I use Pest Warden gear (Dryad armor)?
A: I upgraded from Dryad (110 defense) to Ancient Fossil (120 defense) before this fight. The 60,000 combined HP makes this a longer fight, so extra defense helps. For weapons, if you farmed a well-rolled Swamp Dweller Staff from Pest Warden, bring it — the split projectiles are a natural fit for this fight.
Summary
- Sage and Grit are Tier 3 Boss #5 (final), the 12th boss. Elder assigns them after Pest Warden.
- Summon with Dragon Souls on the temple pedestal in the Desert Biome deep underground.
- Necesse’s first dual-boss fight. 30,000 HP each (60,000 total).
- Kill one dragon early and the other berserks. Defeat both simultaneously — the whole fight.
- Piercing weapons underperform (dragons rarely overlap). Swamp Dweller Staff split projectiles work better.
- Attack cycle: circling → charge → flame beam. Circling = free damage; they don’t attack.
- Flame beam: stay center, rotate with the dragons.
- Elder reward on first clear: Blink Scepter (dash ability trinket).
- Defeating them unlocks the desert temple and opens the path to the final boss.
Related Articles
| Article | Link |
|---|---|
Boss Navigation
| Previous Boss | Index | Next Boss |
|---|---|---|
| ← Pest Warden | 📋 Full Boss Guide | Fallen Wizard → |
Published: 2026-05-24
Test Environment: Necesse v1.0 (PC), Difficulty: Classic, Solo