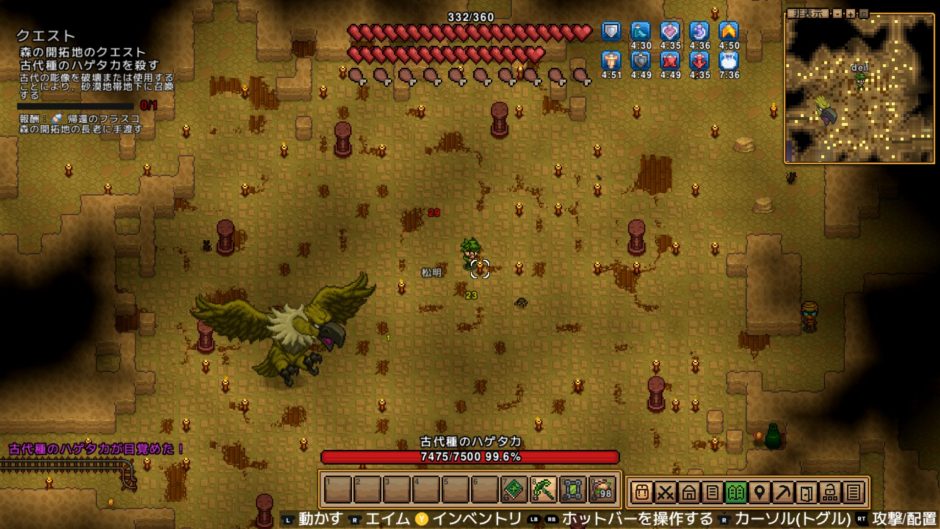

The second Tier 2 boss, and the first real flying boss in the game. This giant vulture swoops in from the sky when you activate an Ancient Statue in the desert — and unlike the bosses you’ve fought so far, it never stops moving. It circles overhead, dive-bombs you, lays eggs that hatch into Vulture Hatchlings, and fires feather barrages while copying your movement. It sounds like a lot. It’s actually more manageable than the Swamp Guardian if you remember one rule: destroy every egg the moment it lands.
I went in with the same Ivy gear I used on the Swamp Guardian, didn’t use a single healing potion, and walked away thinking “is that it?” — but only because I stayed on egg duty.
What Is the Ancient Vulture?
The Ancient Vulture is the second Tier 2 boss in Necesse, fought after the Swamp Guardian. It’s the sixth boss the Elder assigns in the main progression.
It fights in the desert biome — either on the surface or underground — and it flies freely throughout the entire arena. That’s the main difference from every boss before it: you can’t just stand still and trade hits. It comes to you, and you have to keep moving.
During the fight, it periodically lays Ancient Vulture Eggs on the ground. Let those hatch into Vulture Hatchlings and you’ll find yourself buried in feather fire from two directions at once.
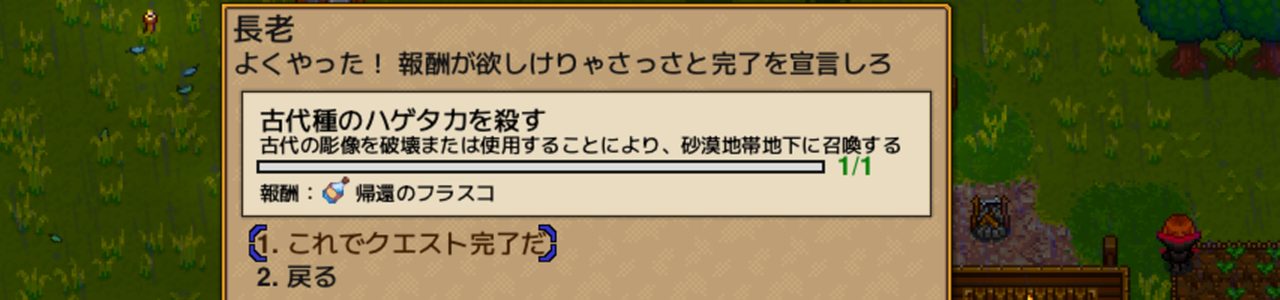
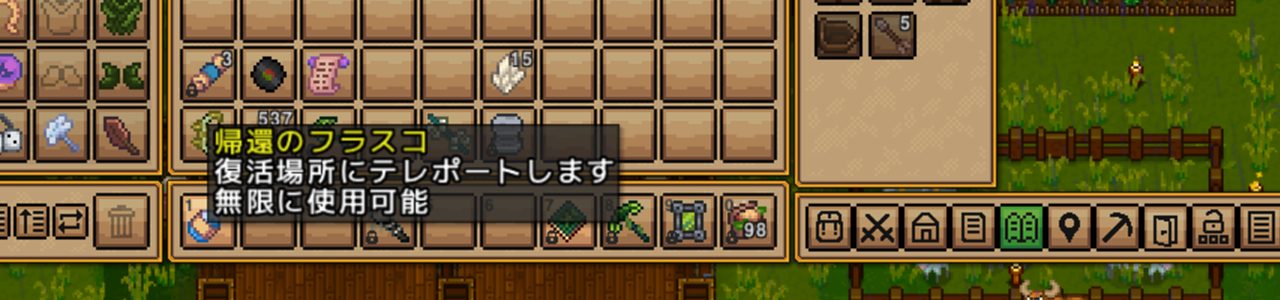
Beat it and report back to the Elder for a Recall Flask — an infinite-use teleport item that sends you home from anywhere. Honestly, that reward changes the game more than any weapon drop.
How to Summon the Ancient Vulture
Getting the Ancient Statue
Two ways to trigger this fight:
- Destroy a fixed Ancient Statue found in desert caves — this is how I encountered it (accidentally broke one while exploring)
- Craft an Ancient Statue from crystals dropped by crystal-carrying enemies in the desert underground. One kill usually gives around 10 crystals.


Summon Location Notes
- Works on the desert surface or underground
- Surface is the standard pick — more space to maneuver, and you can get desert village NPCs to help
- Underground has tighter space, but if you’re using the Swamp Tome (which bounces off walls), a walled-off cleared area can actually be useful for racking up reflected hits
- Destroying a fixed statue in a cave starts the fight immediately — don’t break them by accident if you’re not ready
Pre-Fight Prep
Gear Checklist
| Slot | Recommended | Notes |
|---|---|---|
| Armor | Full Ivy set (magic head piece) | Same set you used on the Swamp Guardian — still enough |
| Weapons | Swamp Tome + Spider Staff | Tome bounces off walls (great underground), spider minions hit eggs and hatchlings automatically |
| Potions | Healing potions, stat buffs | I didn’t use any, but bring them anyway |
| Food | High-tier cooking | Eat before the fight for combat buffs |
Arena Setup (Surface)
- Set up a Banner Stand beforehand — the attack and defense buffs stack up over a long fight
- Summoning near a desert village lets you pull NPCs into the fight; stick to summon builds or single-target weapons so you don’t accidentally aggro them
- Clear some terrain in advance — cacti and elevation changes will get you killed when you’re trying to dodge
Stats
| Stat | Value |
|---|---|
| HP (Classic) | 7,500 |
| Defense | 20 |
| Collision damage | 43 |
| Feather damage | 47 |
HP is half of the Swamp Guardian’s 15,000. The catch is that hitting a moving airborne target consistently is harder than it sounds, so the fight takes longer than the numbers suggest. Still, same gear, no healing — Ancient Vulture is one of the easier Tier 2 fights.
Multiplayer: +80% HP per additional player.
Attack Patterns
The Ancient Vulture uses three attacks throughout the fight. As its HP drops, its movement speed and attack frequency both increase.
Attack 1: Aerial Charge (Dive-Bomb)
What it does:
– Flies around and charges directly at your position
– This happens constantly — it’s the baseline behavior for the entire fight
How to dodge:
Watch the flight path and sidestep. Don’t stand still and face it head-on. If you’re riding a mount (Ostrich works great), you have enough speed to comfortably outpace the charge.
Attack 2: Egg Laying → Vulture Hatchlings
What it does:
– Drops Ancient Vulture Eggs on the ground during the fight
– Leave them alone and they hatch into Vulture Hatchlings
– Hatchlings chase you and fire feathers
– Unchecked, they stack up into a feather barrage you can’t navigate
How to handle it:
Destroy every egg the moment it lands. This is the single most important mechanic in this fight. AoE weapons make egg cleanup much easier. Summon builds get some automatic help — spider minions from the Spider Staff will target both eggs and hatchlings — but even with minions helping, don’t let them pile up.
Attack 3: Feather Barrage (Mirroring)
What it does:
– Fires feathers toward your position
– While doing this, the Ancient Vulture mirrors your movement — it flies in the same direction you’re walking
– Attack frequency and speed increase as HP drops
How to dodge:
Constant movement in one direction gets countered by the mirroring. Use sudden direction changes and feints — unpredictable movement is the key. A technique worth knowing: while it’s mirroring, briefly stop, then immediately dash in a different direction. It breaks the read.
Attack Pattern Summary
[Throughout the fight] Constant: Aerial charges (dive-bomb) Periodic: Lays Ancient Vulture Eggs → hatch into Vulture Hatchlings if not destroyed Periodic: Feather barrage (mirrors your movement) * Speed and attack frequency increase as HP drops * Egg duty falling behind = fight collapses fast
[Keys to winning] ① Destroy eggs immediately — above everything else ② Damage the boss with ranged attacks or summons ③ In the final phase (high speed), prioritize dodging over attacking
Drop Items
Elder Reward (First Kill)
| Item | Effect | |
|---|---|---|
| Recall Flask | Infinite-use teleport home. Works from anywhere, anytime. |
This is a quality-of-life revolution. Full inventory mid-exploration? Blink home. Stuck in a dangerous cave? Blink home. Every minute you used to spend walking back to base — gone. The Recall Flask is the real reason to hunt this boss.
Random Weapon Drop (One of the following)
| Item | Type | Notes | |
|---|---|---|---|
| Vultures Talon | Melee (Spear) | Three-hit combo, good reach | |
| Vultures Burst | Ranged (Bow) | Fires high-speed piercing shots — pierces regardless of arrow type | |
| Vulture Staff | Summoner | Summons a Vulture Hatchling to fight for you. 18 summon damage |
Vulture Mask (cosmetic) has a ~10% chance to drop as a bonus.
Worth farming?
All three weapons are mid-Tier 2 level. Vultures Burst is the standout — the pierce-on-all-arrows trait is strong whenever enemies clump together. Summoner builds benefit specifically from Vulture Staff adding an aerial minion. But the Recall Flask is a guaranteed first-kill drop and is more impactful than any of the weapon options. Farming for weapons is a matter of build preference, not necessity.
What to Do After the Kill
1. Talk to the Elder and Grab the Recall Flask
Return to your settlement and report to the Elder. You’ll receive the Recall Flask. Set it in your hotbar immediately — you’ll wonder how you played without it.
2. Try the Weapon Drop
You should have gotten one of Vultures Talon, Vultures Burst, or Vulture Staff. If it fits your build, it’s worth using for a while. Vultures Burst in particular is a strong pick for bow builds — the piercing makes clearing groups of enemies noticeably faster.
3. Prepare for the Pirate Captain
The next Tier 2 boss is the Pirate Captain, fought in the ocean biome. Start prepping a boat and thinking about water combat. Your Ancient Vulture weapon drop plus Ivy armor is enough to take it on.
FAQ
Q1: I can’t find the desert biome
A: Open your world map and look for a yellow island. It’s often far from your starting area — you’ll likely need a boat to reach it.
Q2: Surface or underground — which is better?
A: Surface is the default recommendation. More space, easier dodging, and NPCs can help. That said, I personally fought it underground after accidentally breaking a fixed statue. If you’re using the Swamp Tome (bounces off walls), a cleared walled chamber underground can actually give you strong reflected damage — it’s a viable approach, just not the easy one.
Q3: I can’t keep up with the eggs
A: Switch to an AoE weapon or rely more on summon minions. The Spider Staff’s spiders actively target eggs on the ground, which helps a lot. If you’re still struggling, revisit your gear setup or boost damage output with Swamp Guardian drops before trying again.
Q4: NPCs keep turning hostile when I fight near the village
A: They aggro when caught in your AoE. Summon builds or single-target weapons prevent friendly fire. Note that Ivy armor’s poison proc can also hit NPCs, so watch your positioning.
Q5: What’s the recommended Tier 2 boss order?
A: Swamp Guardian → Ancient Vulture → Pirate Captain is the standard path. Ivy armor (crafted from Swamp Guardian drops) is the baseline Tier 2 kit, so get that first before tackling the Ancient Vulture.
Summary
- Summon the Ancient Vulture by destroying a fixed Ancient Statue in desert caves, or by crafting one from crystals dropped by crystal-carrying enemies
- Fight on the desert surface — more space, NPC support available
- Destroy every Ancient Vulture Egg immediately — this is the fight’s most important mechanic
- Three attack patterns: aerial charges, egg laying, and a feather barrage that mirrors your movement — all speed up as HP drops
- 7,500 HP, 20 defense; hits hard but manageable with Ivy gear
- Recall Flask from the Elder permanently transforms how you explore
Related Articles
Boss Navigation
| Previous | Index | Next |
|---|---|---|
| ← Swamp Guardian | Boss Guide Index | Pirate Captain → |
Published: 2026-05-23
Tested on: Necesse v1.0 (PC), Classic difficulty, Solo