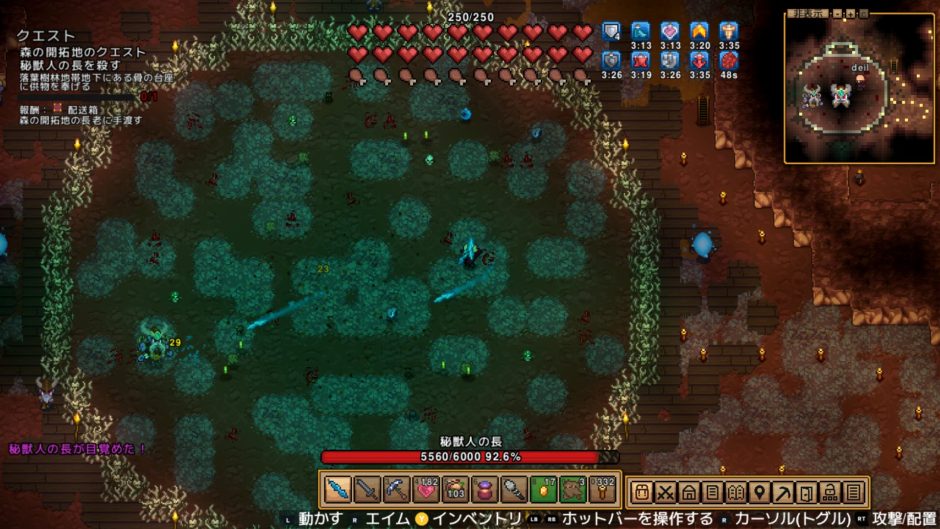

The fourth Tier 1 boss — and the first one that makes you fight through a mob wave before the boss even shows up. You summon it with a Bone Offering in the Deciduous Forest Underground arena, survive a wave of Runebound Brutes, Trappers, and Shamans, then take on the Chieftain itself. The arena is fixed terrain, no remodeling allowed, and you’re dealing with a dash, a spike wall attack, and a shield throw all in rotation.
I went in with full Bloodplate gear, a Spider Staff, and a Frost Piercer. Cleared it on the first attempt. Compared to the clone nightmare of the Void Wizard, the Runebound Chieftain is surprisingly straightforward once you understand the pattern.
What Is the Runebound Chieftain?
The Runebound Chieftain is the fourth Tier 1 boss in Necesse — the one the Elder sends you after dealing with the Evil’s Protector, Queen Spider, and Void Wizard.
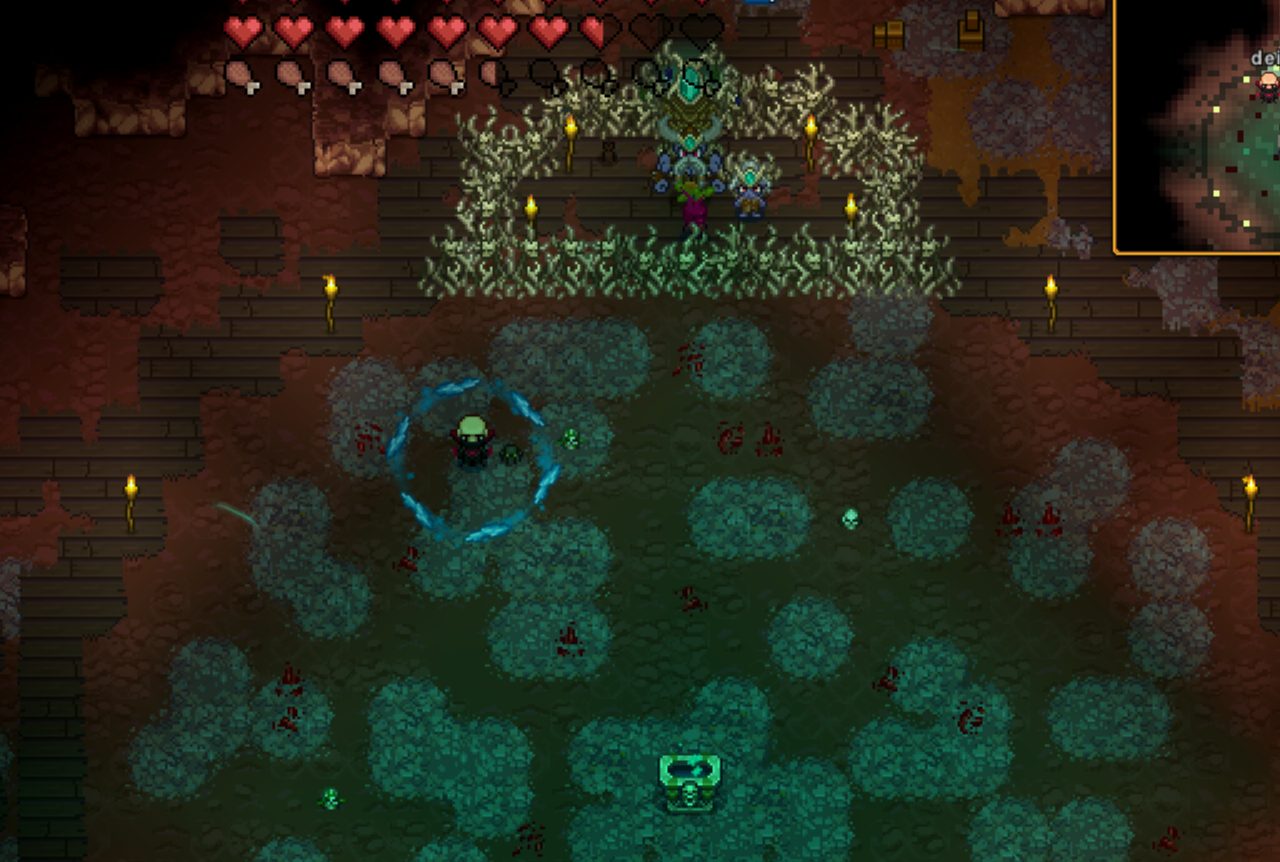
It fights in a fixed underground arena in the Deciduous Forest Biome. Like the Void Wizard, you cannot modify the terrain in this arena. When you use the Bone Offering at the altar, bone spike walls rise up to seal the arena, and a portal starts spawning enemies. You clear the mob wave first, then the Chieftain drops in — it’s a two-phase fight.
Defeating it unlocks the Shipping Chest reward from the Elder: a furniture piece that lets you sell items to merchants remotely from your settlement.
How to Find the Deciduous Forest Underground Arena
Step 1: Locate the Deciduous Forest
The Deciduous Forest Biome looks like an autumn forest — visible on the world map. It’s a subtype of the forest biome, with a distinct color on the overworld map.
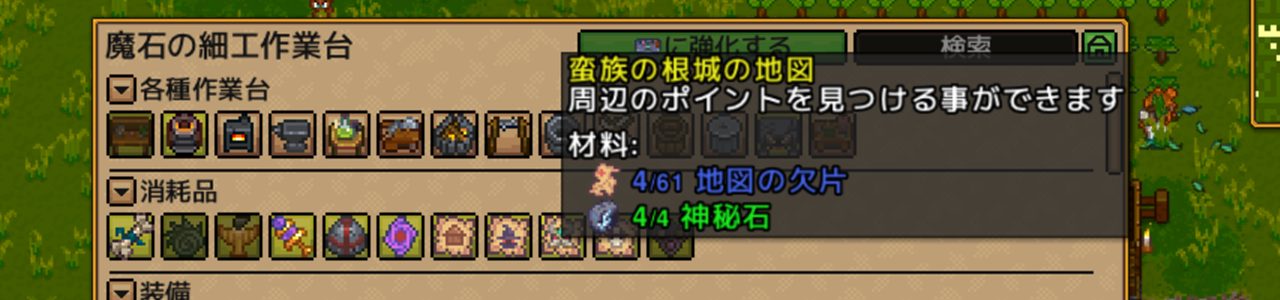
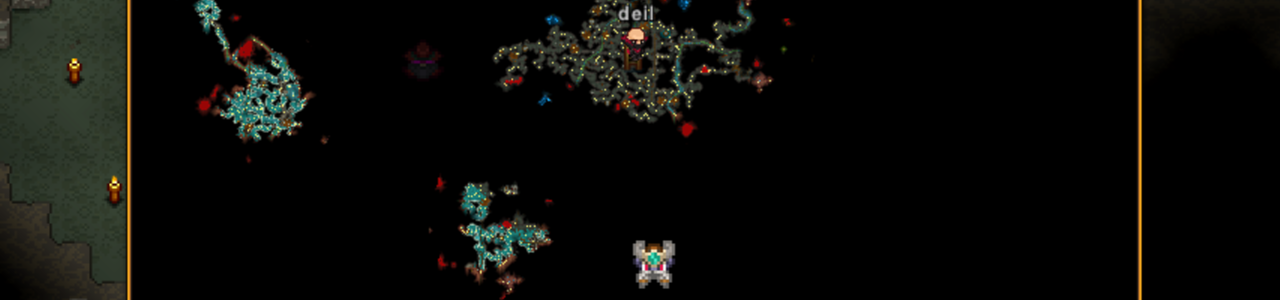
In v1.1 and later, you can craft a Chieftain Map at a crafting table. It marks the arena location on the deep-layer map of the Deciduous Forest, which saves a lot of blind searching.
Step 2: Enter the Underground and Find the Arena
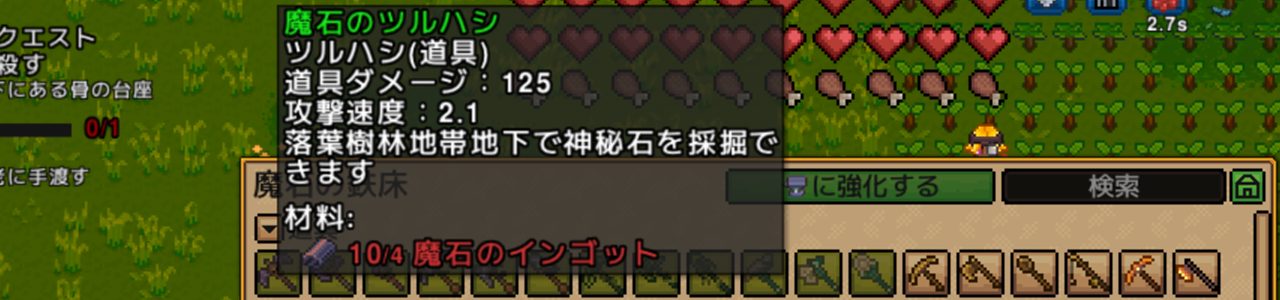
You’ll need at least a Demonic Pickaxe to mine through the walls in the Deciduous Forest Underground — a Gold Pickaxe won’t cut it.
Explore until you find a large chamber with an altar in the center. The arena is open at first; once you use the Bone Offering, the walls seal you in.
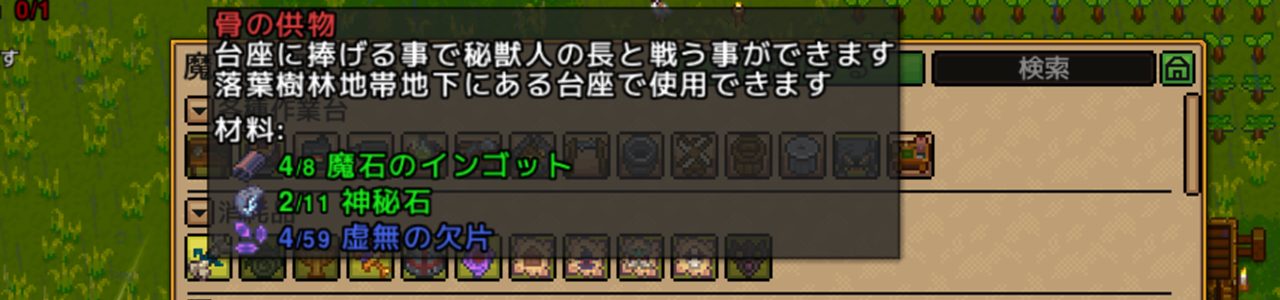
Summoning Condition: Getting the Bone Offering
You need a Bone Offering to summon the Runebound Chieftain.
Where to Get It
Bone Offerings drop from enemies in the Deciduous Forest Underground caves and also appear in chests. You’ll naturally collect them while clearing the dungeon — no dedicated farming needed. If you’re coming up short, check if there’s a crafting recipe for it (available in v1.1+).
Summoning Notes
- Only usable in the Deciduous Forest Underground arena
- Using it at the altar raises bone spike walls that seal the arena
- A mob wave spawns first — clear all enemies before the Runebound Chieftain appears
- In multiplayer, other players can enter through a portal on the outside of the arena
Pre-Fight Preparation
Gear Checklist (My First-Clear Loadout)
| Slot | My Setup | Notes |
|---|---|---|
| Armor | Full Bloodplate set | Same gear you used up to the Void Wizard works fine. Demonic armor also viable |
| Weapon | Spider Staff + Frost Piercer | Summoner build handles the mob wave and boss simultaneously |
| Potions | Health Potions | Factor in what you’ll spend on the mob wave — don’t arrive with just enough for the boss |
| Food | High-tier meals | Eat your buffs before engaging |
The Void Wizard fight pushed me to bench the Spider Staff (spiders were killing the clones before they reflected back), but Runebound Chieftain has no clone mechanic. You can go all-out summoner. This ended up being one of the easiest first-clears in Tier 1 for my summoner build.
The Mob Wave Is the Real Prep Work
The key feature of this fight: you can’t touch the boss until the mob wave is cleared. Three enemy types spawn from the portal:
| Enemy | Role |
|---|---|
| Runebound Brute | Melee tank — high HP, slow |
| Runebound Trapper | Ranged — snares and nets to lock you down |
| Runebound Shaman | Magic — heals and buffs other enemies |
Kill the Runebound Shaman first. If you leave it alive, it keeps healing the other enemies and the wave drags on forever. Priority order: Shaman → Brutes → Trappers. With a summoner build, the Spider Staff handles crowd control on its own — you mostly just need to focus-fire the Shaman.
Don’t burn through all your potions on the mob wave. If you arrive at the boss fight on fumes, you’re going to lose.
Arena Layout
Terrain cannot be modified. Banner Stands can be placed, though — if you have offensive or defensive banners handy, drop them in a corner before starting.
Stats
| Stat | Value |
|---|---|
| HP (Classic) | 6,000 |
Progression through Tier 1 bosses: Evil’s Protector (3,000) → Queen Spider (5,000) → Void Wizard (5,200) → Runebound Chieftain (6,000). Highest raw HP in Tier 1.
That said, in terms of total fight time, the Void Wizard’s phase switching and clone management felt longer. The Chieftain’s HP goes down clean without the gimmick overhead.
Multiplayer scaling: +80% HP per additional player.
Attack Patterns and How to Dodge
The Runebound Chieftain runs a consistent rotation. Attack speed increases as HP drops, but the pattern itself doesn’t change.
Attack 1: Dash Attack
What it does:
– Charges up with its axe, then dashes in a straight line toward you
– There’s a brief windup before the dash that telegraphs the direction
How to dodge:
Move sideways when you see the windup animation. Standing directly in its path means you take the full hit. On Ostrich mount you can dodge it comfortably; on foot the timing is tighter.
After the dash, there’s a short recovery window. Melee and ranged players should take that opening to deal damage. Summoner players — just dodge and let your minions do the work.
Attack 2: Spike Array (Center Attack)
What it does:
– The boss moves to the center of the arena and fires a radial pattern of earth spike rows outward
– Each row ends with a Greater Earth Spike that explodes when the full wave completes
How to dodge:
Stand in the gaps between spike rows. The spikes spread radially, so find an empty lane and move into it quickly. The Greater Earth Spike explosions at the tips have wide radius — staying closer to the boss (near the base of the rows) is sometimes safer than being at the arena edge.
During this attack, the boss is planted in the center. You can either pressure it at close range or poke from a distance through the gaps.
Attack 3: Shield Throw & Recall
What it does:
– Throws multiple runic shields that embed in the arena walls
– Performs several dash attacks (Attack 1) to reposition
– Then recalls the shields back to itself — they fly back in a straight line
How to dodge:
The recall is the dangerous part. If you’re standing between the boss and a lodged shield, the returning shield will hit you. Track where each shield lands, and don’t stand in the line between the boss and any embedded shield.
Before recalling, the boss uses the dash attack to position itself. This creates a two-step dodge requirement: dodge the dash, then clear the recall line. New players tend to watch the shield and get hit by the dash — prioritize dodging the dash first, then worry about the shields.
Attack Rotation Summary
[FIGHT START] Mob Wave — Runebound Brutes, Trappers, Shamans ※ Kill Shamans first. Conserve potions. ↓ Wave cleared
[BOSS PHASE] Dash → Center Spike Array → Dash (x2-3) → Shield Throw → Dash (positioning) → Shield Recall → Repeat ※ Speed increases as HP drops — the pattern stays the same but gets tighter
Drop Items
Elder Reward (First Kill)
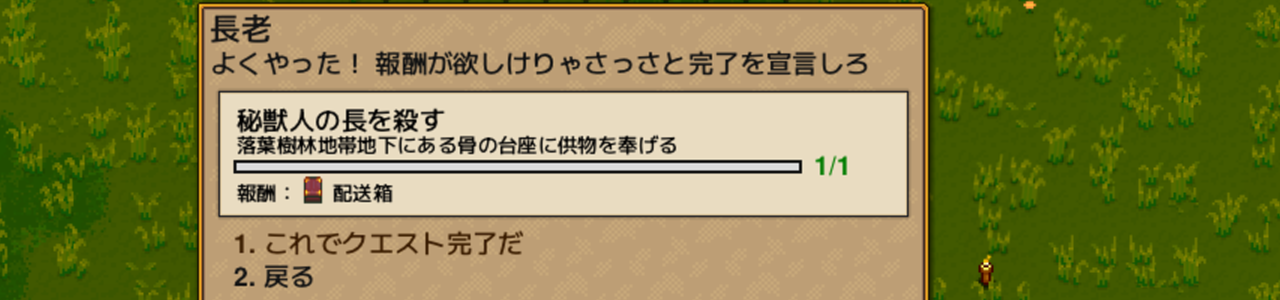
| Item | Effect | |
|---|---|---|
| Shipping Chest | Place in your settlement to sell items to merchants remotely. No more running back every time your inventory is full |
Honestly, this is the reason to kill the Runebound Chieftain. The Shipping Chest completely changes how exploration feels — you just dump everything into the chest when you get back to base instead of trekking to the merchant. For heavy miners and looters, this is massive.
One-Time Drop
| Item | Effect | |
|---|---|---|
| Runic Heart | Permanently increases max HP by 50 |
Same effect as the Demon Heart from Evil’s Protector. Use it immediately — permanent HP upgrades are never optional.
Random Drop (One of the Following)
| Item | Type | Notes | |
|---|---|---|---|
| Brute’s Battleaxe | Melee | Charge attack that dashes forward — same motion as the boss’s dash | |
| Captor’s Shortbow | Ranged | Fires arrows in a spread. Right-click captures smaller enemies — useful for mob wave control | |
| Runebound Scepter | Magic | Left-click fires a trail of earth spikes ending in a Greater Earth Spike. Right-click detonates all nearby Greater Earth Spikes |
Worth Farming?
All three weapons are solid Tier 1-to-2 bridges. The Captor’s Shortbow’s wide spread is especially good for mob wave control in later fights. The Runebound Scepter has a unique set-and-detonate playstyle that magic builds will want to grab.
That said, the Shipping Chest is the main prize and it’s guaranteed on first kill. Whether to farm for weapons depends on your build.
What to Do After Defeating the Chieftain
1. Collect the Shipping Chest from the Elder
Head back to your settlement and talk to the Elder. You’ll receive the Shipping Chest. Place it near your storage or merchant area — it’s going to become one of your most-used pieces of furniture.
FAQ
Q1: I can’t find the Deciduous Forest Underground arena
A: In v1.1+, craft the Chieftain Map and use it to reveal the arena location on the deep layer map of your Deciduous Forest island. Pre-v1.1, you’ll have to sweep the entire underground manually.
Q2: I’m running out of potions on the mob wave
A: Your gear is probably too weak. Make sure you have a full set of Bloodplate or Demonic armor. If you don’t have AoE coverage on your weapon, the wave will grind you down. Kill the Runebound Shaman first — once it’s gone, the other enemies stop getting healed and go down much faster.
Q3: I keep getting hit by the shield recall
A: After the boss throws the shields, mentally mark each wall location. Before it recalls, the boss dashes into position — dodge the dash, then immediately check your position relative to the embedded shields. Standing in the center of the arena gives you more room to maneuver away from the recall lines compared to hugging the walls.
Q4: What order should I fight Tier 1 bosses?
A: The Elder’s intended order is: Evil’s Protector → Queen Spider → Void Wizard → Runebound Chieftain. The Chieftain is mechanically the most demanding of the four because of the mob wave — come in with gear that’s at least current to the Void Wizard fight.
Q5: Should I place Banner Stands before the fight?
A: If you have them, yes — offensive banners are a free damage boost. Place them in a corner so they don’t eat up maneuvering space during the spike array phase.
Summary
- The Bone Offering drops from enemies and chests in the Deciduous Forest Underground — you’ll collect enough naturally
- The Chieftain Map (craftable in v1.1+) marks the arena on the deep-layer map
- Mob wave first — Runebound Brutes, Trappers, and Shamans. Kill Shamans first, conserve potions
- Boss rotation: Dash → Spike Array → Shield Throw → Shield Recall — speed ramps up as HP drops, pattern stays the same
- 6,000 HP — highest raw HP in Tier 1, but the fight is more mechanical than the Void Wizard
- Shipping Chest is the primary reward. The Runic Heart is a permanent max HP upgrade. Both are guaranteed.
Related Articles
Boss Navigation
| Previous Boss | Overview | Next Boss |
|---|---|---|
| ← Void Wizard | Complete Guide Index | Swamp Guardian → |
Published: 2026-03-21
Verified on: Necesse v1.0 (PC), Difficulty: Classic, Solo