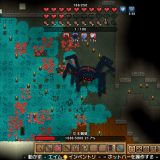

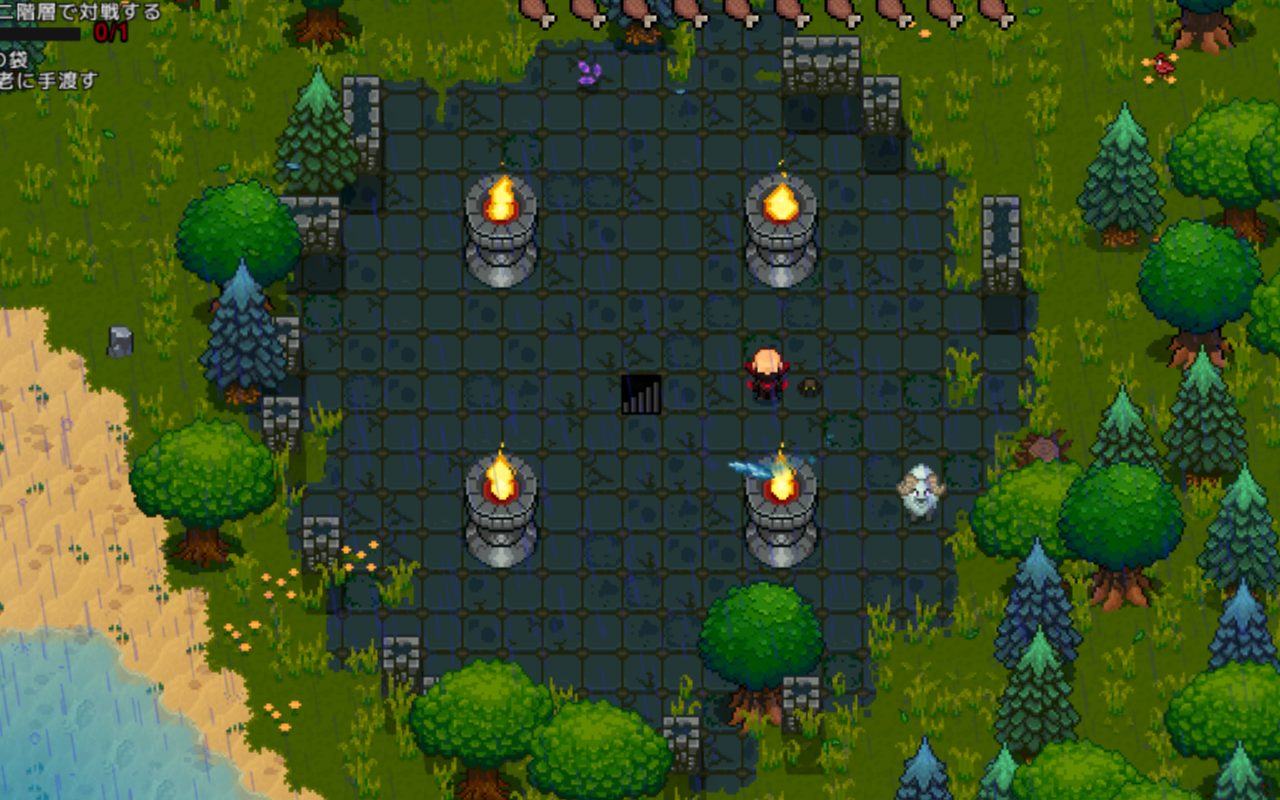
The last Tier 1 boss — and the most punishing. The Void Wizard sits in an indestructible arena at the bottom of the dungeon, firing through candlesticks that only block your shots, and spawning clones that explode into bouncing bolts if you destroy them.
I went in with a full Bloodplate set and a Frost Piercer and lost twice before figuring out what was actually happening. First run: destroyed too many clones, got buried in bouncing bolts. Second run: my spider summons killed the clones for me — same result. Third run: no spider summons, riding an Ostrich for mobility, ignored every clone — won without breaking a sweat. Once you understand the pattern, this boss is manageable.
What Is the Void Wizard?
The Void Wizard is the third and final Tier 1 boss in Necesse, following Evil’s Protector and Queen Spider. Defeating it completes Tier 1 and unlocks access to the Tier 2 biome bosses.
Unlike the other Tier 1 bosses, the Void Wizard fights in a fixed arena you cannot modify. The furniture and candlesticks stay exactly where they are. No pre-fight landscaping — but also no option to reshape the battlefield in your favor.
Defeating the Void Wizard for the first time rewards the Empty Pendant, which adds one accessory slot to your character — a permanent upgrade that benefits every build. You’ll also unlock Void Shard crafting for Tier 2 gear.
How to Reach the Dungeon
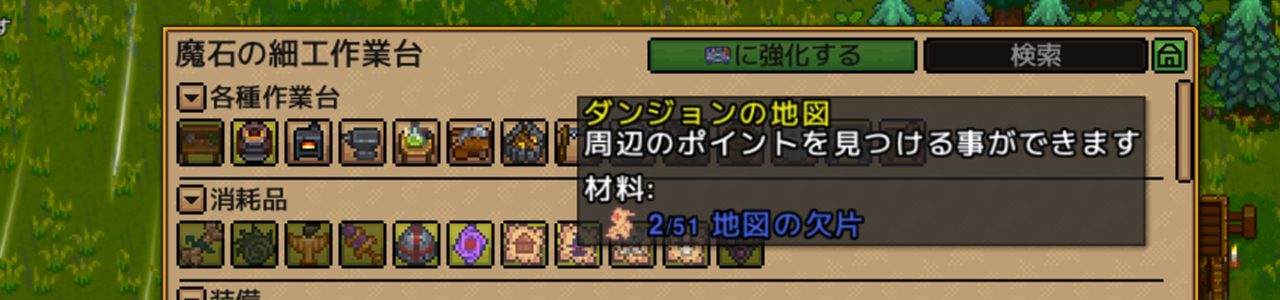
Step 1: Craft a Dungeon Map
To find the Void Wizard, you need to locate the Dungeon. Craft a Dungeon Map at a Workbench using 2× Map Fragments, then use it to reveal the dungeon’s location on the world map.
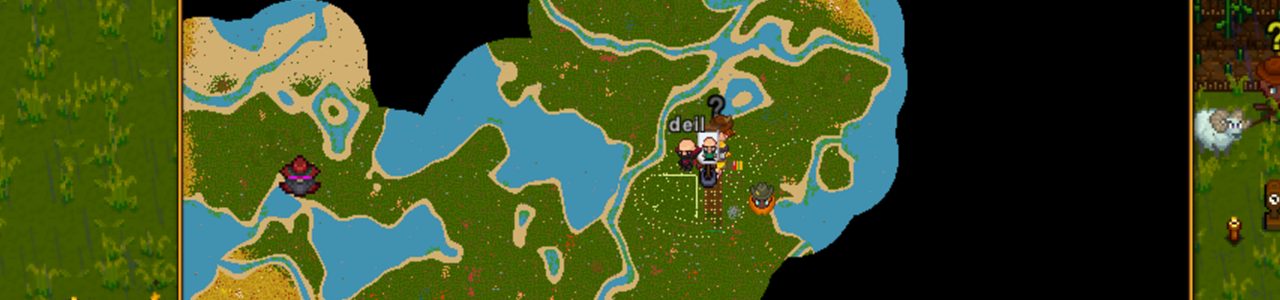
Step 2: Navigate to the Dungeon Entrance
Open the world map after using the Dungeon Map to find the entrance — it’s usually on an island in the Deciduous Forest Biome. Clear the vampires and Void Apprentices patrolling the entrance before heading in.
Step 3: Clear the First Floor
The dungeon has two floors. The first floor spawns enchanted zombie variants and Void Apprentices. Void Apprentices drop Void Shards, so pick them up if you can — they’re useful for Tier 2 crafting later.
Watch the glowing rune circles on the floor. Stepping on them applies debuffs. Stay aware of where you’re walking.

Chests on the first floor can contain Void Spear, Void Boomerang, Lightning Hammer, Mobility Cloak, and Mesmer Tablet. The Mobility Cloak is especially worth grabbing — it significantly improves out-of-combat movement, which matters for getting around safely between attempts.
You can also recruit magic-user type settlers found inside the dungeon. Talk to them and invite them to your settlement.
Step 4: Descend to the Second Floor
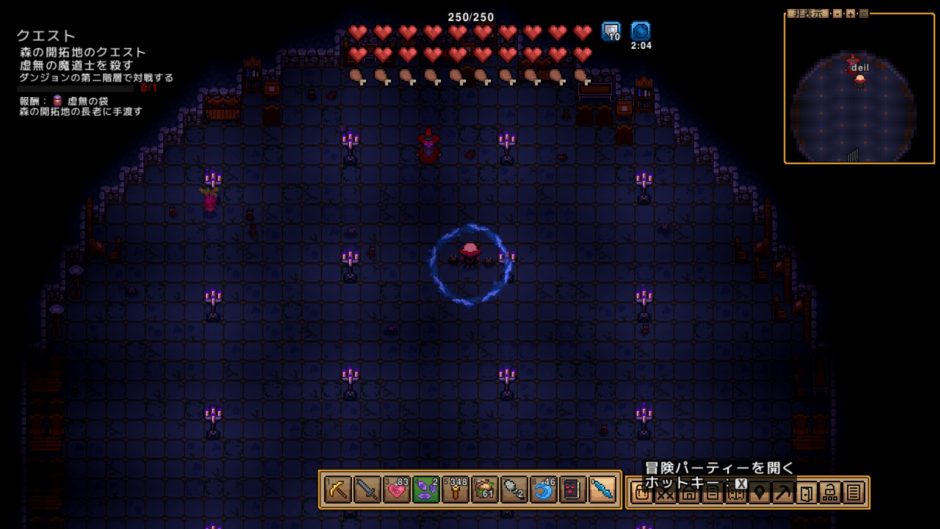
Find the stairs and head down. The Void Wizard’s room is at the far end of the second floor. The Void Wizard is not initially hostile — it won’t attack until you do. Take the moment to check your gear before committing to the fight.
Summoning the Void Wizard
First Fight: Attack Directly
Walk up and hit the Void Wizard to start the fight. No summoning item required — just reach the dungeon and you’re ready.
This is more convenient than Evil’s Protector or Queen Spider (both need summoning items), but the trade-off is the fixed arena: you can’t set up the battlefield in advance.
Rematches: Void Caller
After the first kill, craft a Void Caller and use it inside the dungeon arena to resummon the boss. Use this for farming drops.
Pre-Fight Preparation
Gear Checklist (What I Used for the Kill)
| Slot | Item | Notes |
|---|---|---|
| Armor | Bloodplate set | The Queen Spider gear carries over fine |
| Weapon | Frost Piercer (summon) | No spiders — reasons explained below |
| Mount | Tame Ostrich | Movement speed boost makes dodging dramatically easier |
| Consumables | Recovery potions ×10+ | You’ll use more than you expect |
Why Summoner Beats Ranged Here
The arena is full of candlesticks. They block your projectiles. They don’t block the boss’s projectiles. If you’re running a bow or gun build, you’ll find yourself constantly repositioning to find angles that actually connect — and while you’re doing that, the boss is hitting you with attacks that go straight through the candlesticks.
Summon weapons sidestep this entirely. Your minions automatically track the boss and deal damage without caring about line-of-sight obstacles.
The catch: summons also attack clones (more on this in the attack section). Using aggressive minions like spider summons will cause them to destroy clones and flood the arena with bouncing bolts. For this boss specifically, use Frost Piercer only and leave the spider summons behind. Frost Piercer’s crystal minions are less likely to immediately prioritize clones, but if you can, avoid all summons during Phase 1 clone waves and reintroduce them in Phase 2 where clones no longer appear.
Melee avoids the candlestick problem too, but staying in melee range during Phase 1 is difficult with multiple projectile types incoming simultaneously.
Arena Notes
No preparation needed — and none possible. The furniture can’t be broken. One thing to do before the fight starts: map the candlestick positions in your head. If you’re using any ranged attacks at all, knowing where the clear angles are prevents the “shooting but nothing lands” death spiral.
Stats
| Stat | Value |
|---|---|
| HP (Classic) | 5,200 |
Evil’s Protector is 3,000 HP on Classic; Queen Spider is 5,000. The Void Wizard is the tankiest Tier 1 boss by a margin. It also has higher armor, so expect the fight to take longer than Queen Spider even with similar DPS.
Multiplayer scaling: +80% HP per additional player.
Damage Values
| Attack | Damage |
|---|---|
| Bouncing Bolt | 42 |
| Missile | 35 |
| Homing Bolt | ~33 |
| Wave (Phase 2 only) | 32 |
Evil’s Protector peaks at 50 damage (slam); Queen Spider peaks at 28 (charge). The Void Wizard’s standard attack hits for 42 damage, and it often throws multiple projectiles at once. This is the hardest-hitting Tier 1 boss.
Attack Patterns — Two Phases
The Void Wizard switches behavior at 50% HP. Unlike Evil’s Protector (which adds attacks gradually), this boss has a clean phase transition — a visible transformation animation marks the shift.
Phase 1: 100%–50% HP
Three attacks cycling in rotation. The boss stands still during Phase 1 attacks, which creates openings for damage.
Attack 1: Missile Barrage
What it does:
– Boss stops and summons multiple missiles around itself
– Each missile points in a fixed direction
– Brief delay, then they all launch simultaneously
How to dodge:
Check which directions the missiles are pointing the moment they spawn, then move perpendicular to the danger zone. The stationary period is also your best attack window in Phase 1. Don’t get greedy and you can land solid hits every cycle.
Attack 2: Fan-Spread Homing Bolts
What it does:
– Boss stops and fires a spread of homing bolts toward the player
– Each bolt tracks the player’s position
How to dodge:
Same principle as Evil’s Protector’s homing attack — keep moving and the bolts can’t catch you. The spread means multiple bolts are incoming, so don’t back yourself into a corner. Run wide circles around the arena and the bolts expire on their own after a few seconds.
Attack 3: Clone Summon — The Fight’s Core Mechanic
What it does:
– Boss spawns several copies of itself around the player
– Clones disappear on their own after a few seconds
The rule: never destroy a clone.
Killing a clone spawns a Bouncing Bolt that ricochets around the arena until the fight ends. Each clone you destroy adds another bolt. Destroy a few and the arena becomes nearly unnavigable. This is what killed me in run one — I kept attacking and didn’t realize the clones were hitting back.
When clones appear: stop attacking the boss, focus on not getting hit, wait for the clones to vanish. Then resume.
Summoner warning — verified in testing: Summon minions actively attack clones. In my first two runs I had spider summons active, and they dismantled every clone the moment it appeared. Bouncing bolts everywhere. Switching to Frost Piercer only (and no spider summons) in run three fixed the problem entirely.
Summoner strategy for Phase 1:
– Do not bring aggressive summons (spiders, etc.)
– Frost Piercer minions are safer but not guaranteed to ignore clones
– When clones appear, prioritize movement — let the clones despawn naturally
Phase 2: Below 50% HP
At 50%, the boss transforms. There’s a brief transformation animation where it’s completely vulnerable — dump everything you have into it during this window. It’s the biggest damage opportunity in the entire fight.
Changes after transformation:
– New attack: Wave — a rippling projectile that spreads across most of the arena (32 damage)
– Boss now moves while attacking (Phase 1 had it standing still for every attack)
– Clone summon is gone — no more clones in Phase 2
– Attack frequency and movement speed both increase
Dodging the Wave
The wave is a wide attack that covers most of the arena floor. The pattern has gaps — you need to time your movement to thread through them. It often overlaps with other attacks, so expect to take some hits until you learn the rhythm. Don’t ration your recovery potions; surviving long enough to deal damage matters more than a clean run.
Phase 2 Strategy
The “boss stands still so I can attack freely” approach from Phase 1 no longer works. The boss is constantly moving, so you’re now in a move, attack, dodge, repeat loop.
This is where summoner becomes strongest. You’re dodging constantly while your minions maintain DPS. And since clones no longer appear in Phase 2, this is the moment to bring everything out. If you held back summons during Phase 1 to avoid clone incidents, go full aggression here.
Attack Summary
[Phase 1] — 100% to 50% HP Missile Barrage → Homing Bolts → Clone Summon → repeat Boss stands still during attacks — use the opening NEVER destroy clones — summon minions will target them too
[Phase 2] — Below 50% HP Missile + Homing + Wave — multiple attack types simultaneously Boss moves continuously No more clones — bring full summon pressure Transformation animation = max DPS window
Drop Items
First Kill Only
| Item | Drop Rate | Effect | |
|---|---|---|---|
| Empty Pendant | 100% | Adds +1 accessory slot permanently |
Comparable to Evil’s Protector’s Guardian Heart (HP+) and Queen Spider’s Spider Heart (HP+50) as first-kill exclusives. The accessory slot increase is the most universally valuable of the three — it expands your build options going forward regardless of your playstyle.
Every Kill
| Item | Drop Rate | Quantity | |
|---|---|---|---|
| Void Shard | 100% | 25 |
Void Shards are the core Tier 2 crafting material. Void Apprentices in the dungeon also drop them, but the boss gives a reliable lump sum each run.
Chance Drops
| Item | Drop Rate | Quantity | |
|---|---|---|---|
| Recall Scroll | 50% | 12–20 | |
| Teleportation Scroll | 50% | 5–10 | |
| [UNVERIFIED: Void Wizard Vinyl] | 20% | 1 |
Recall Scrolls teleport you back to your settlement instantly; Teleportation Scrolls let you warp to any island on the map. Both are genuinely useful for exploration. Stockpile them from farm runs and your post-Tier-1 travels become much smoother.
Random Weapon Drop (One of Three, ~33.3% Each)
| Item | Type | Notes | |
|---|---|---|---|
| Void Staff | Magic weapon | Priority grab if you’re building Magic for Tier 2 | |
| Void Missile | Magic weapon | Same — Magic build foundation weapon | |
| Magic Stilts | Pet summon | Summons a glowing pet. Low utility, high charm |
Void Staff and Void Missile: Your Magic Build Starter Kit
Both weapons are the foundation for a Magic-focused Tier 2 progression. If you’re planning a Magic build, farm until you get one. Melee, Ranged, and Summoner players don’t need them directly, but Void Shards remain the valuable drop for everyone.
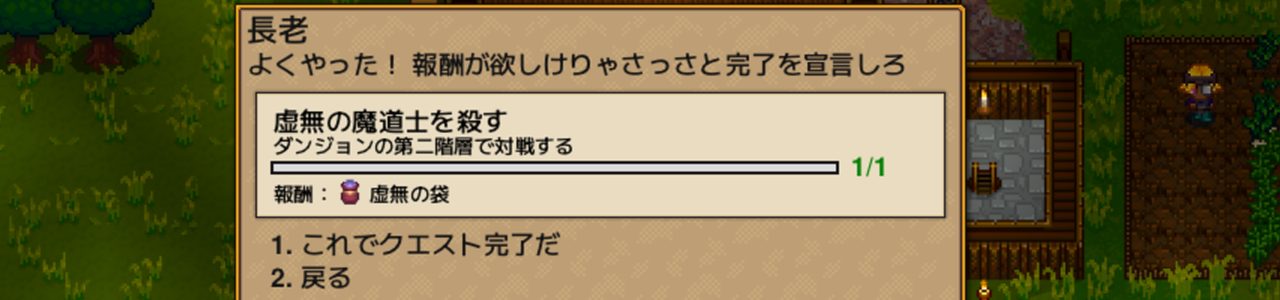
Elder Reward
After your first kill, report back to the Elder at your settlement to receive a Void Bag — a large personal pouch that expands your inventory space.
| Item | Effect | |
|---|---|---|
| Void Bag | Large personal pouch — adds inventory space |
What to Do After Defeating the Void Wizard
1. Use the Empty Pendant to Unlock Your New Accessory Slot
Use the Empty Pendant from your inventory. This permanently adds one accessory slot. Works for every build — don’t skip this.
2. Talk to the Elder for the Void Bag
Return to your settlement and speak with the Elder. The Void Bag inventory expansion is a small upgrade, but consistent quality-of-life improvement across all future exploration.
3. Head Into Tier 2
All three Tier 1 bosses are down. Tier 2 biome bosses are now open.
| Next Boss | Location | Guide |
|---|---|---|
| Swamp Guardian | Swamp Biome | Guide |
| Ancient Vulture | Desert Biome | Guide |
| Pirate Captain ★ | Ocean | Guide |
You can fight Tier 2 bosses in any order, but Pirate Captain is the mandatory progression gate — you cannot advance to Tier 3 without defeating it.
FAQ
Q1: I can’t find the dungeon.
A: Craft a Dungeon Map at a Workbench using 2× Map Fragments. Use it and then open the world map — the dungeon entrance will be marked. It’s typically on an island in the Deciduous Forest Biome.
Q2: I destroyed clones and now the arena is full of bouncing bolts. Can I reset?
A: No — the bolts persist for the rest of that fight. Either die and resummon with a Void Caller, or dodge your way through to the kill. Going forward: when clones appear, stop attacking and move. Summoner builds should drop any summons that actively attack enemies (spiders especially) and use Frost Piercer only.
Q3: My shots keep hitting the candlesticks instead of the boss.
A: The candlesticks block player projectiles but not the boss’s. This is the arena’s built-in disadvantage for ranged builds. Best solution: switch to a summon weapon. Minions ignore candlestick geometry entirely. If you’re committed to ranged, memorize the clear angles before the fight starts.
Q4: What order should I fight the Tier 1 bosses?
A: Evil’s Protector → Queen Spider → Void Wizard is the reliable path. Evil’s Protector gives the Guardian Heart (HP boost) and Demonic gear access; Queen Spider gives the Spider Heart and Frost Piercer; then you bring that full loadout to the Void Wizard, which is the highest-damage Tier 1 boss and the correct one to save for last.
Q5: Phase 2 is destroying me. What do I do?
A: Hit the boss hard during the transformation window right when Phase 2 starts — it’s briefly vulnerable and that’s your best chance to cut the Phase 2 duration short. Then: keep your recovery potion count high, don’t ration them. Phase 2 removes clones entirely, so if you held back summons in Phase 1, deploy them now at full strength. Keep moving; standing still is how you get caught by the wave.
Summary
- Craft a Dungeon Map (2× Map Fragments at Workbench) → find the dungeon → descend to the second floor
- No summoning item required for the first fight — attack the boss directly to start
- Candlesticks block your shots but not the boss’s — Summoner build is the cleanest solution for this arena
- Phase 1: boss stands still → never destroy clones (your summons will target them too — remove aggressive minions)
- Phase 2 (below 50% HP): boss moves constantly + Wave attack added → transformation window is your peak DPS moment
- First-kill exclusive Empty Pendant adds +1 accessory slot — use it immediately
- Toughest Tier 1 boss on raw stats. Gear up fully before attempting.
Related Articles
Boss Navigation
| Previous | Overview | Next |
|---|---|---|
| ← Queen Spider | 📋 Complete Guide | Runebound Chieftain → |
Published: 2026-03-19
Tested on: Necesse v1.0 (PC), Difficulty: Classic, Solo