
Evil’s Protector is the first boss you’ll face in Necesse — and it’s a night-only fight with a hard 6:30 AM deadline. If you’re not prepared, it flees before you can finish it. This guide covers how to get the summoning item, what gear to bring, all four attack phases, and what rewards to expect.
What Is Evil’s Protector?
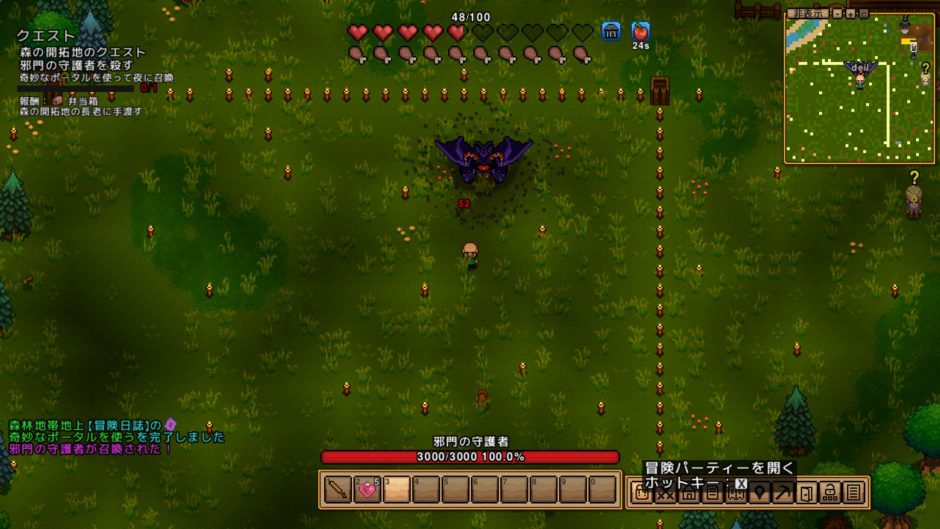
Evil’s Protector is the Tier 1 boss that opens Necesse’s boss progression. Defeat it and you permanently gain +50 max HP, plus access to Demonic Bar crafting — the gateway to mid-game gear.
The catch: night-only boss. It can only be summoned after dark and flees at 6:30 AM game time. Drag the fight out too long and you’ll have to wait until the next night.
How to check the time: Place a clock item and hover over it. You can also check it in your inventory tooltip, or read it when sleeping in a bed.

How to Get the Mysterious Portal (Summoning Item)
You need the Mysterious Portal to call the boss.
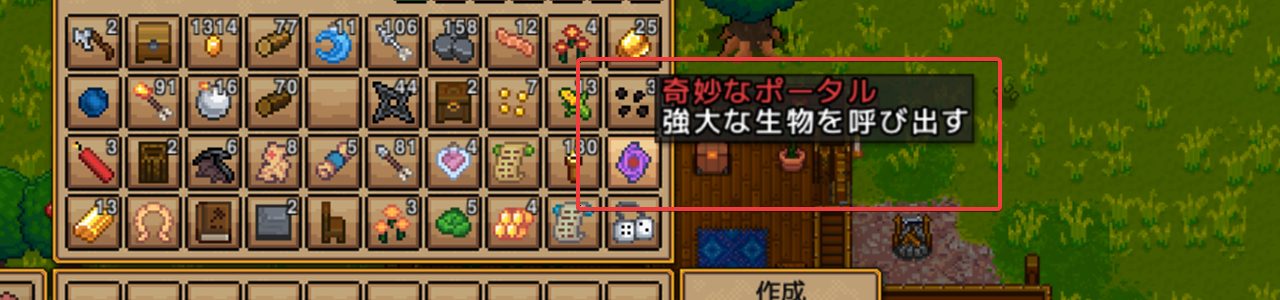
Where to Find It
The Mysterious Portal drops from chests in Forest caves or from underground monsters in the Forest biome. One cave run is usually enough — my first trip netted one Mysterious Portal alongside 29 iron ore and 78 copper ore, so you can knock out gathering and boss prep in a single run.
Surface monsters at night supposedly drop it too, but after grinding two full nights I got nothing. The caves are more reliable.
When to Use It
- Night only — using it during the day does nothing
- Use it right after sunset to maximize your fight window before the 6:30 AM cutoff
- Open ground only — summoning underground doesn’t work (confirmed)
Pre-Fight Preparation
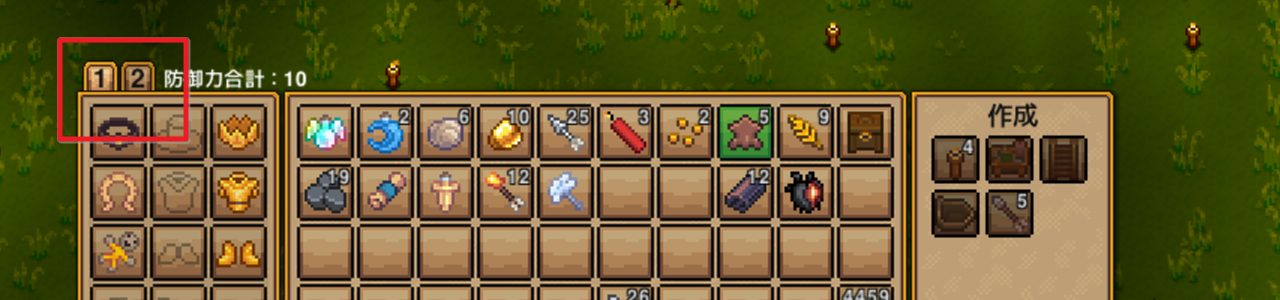
Gear Checklist (What I Used for My First Clear)
| Slot | Recommended | Notes |
|---|---|---|
| Armor | Gold armor set | 7 defense + 2 set bonus. Costs 36 bars (144 gold ore) |
| Weapon | Spider Staff (Summoner build) | Summons 3 spiders that auto-attack. 7–11 damage each — solid and hands-off |
| Accessory | Horseshoe Charm (Sharp) | +5% crit, +4% damage |
| Potions | 5+ Health Potions | Restores 50 + 10% of max HP. Craft with 3 Sunflowers + 2 Glass Bottles |
My first-clear loadout: Gold Crown (not the helmet — trading 5 defense for an extra summon slot), Gold Chestplate, Gold Boots, Horseshoe Charm (Sharp), Spider Staff, Iron Sword as backup. Total defense: 10.
I tried Copper armor (5+2) and Iron armor (7+2) and lost both times. That might just be a skill issue on my part, and plenty of strategies work — but Gold armor is where things clicked.
Crafting Health Potions
2 Health Potions require:
– Sunflower ×3
– Glass Bottle ×2 (Glass ×1 ← Sand ×1 ← Stone ×5)
Each restores 50 + 10% of max HP — so 60 HP at 100 max HP. Single-use, so make a stack.
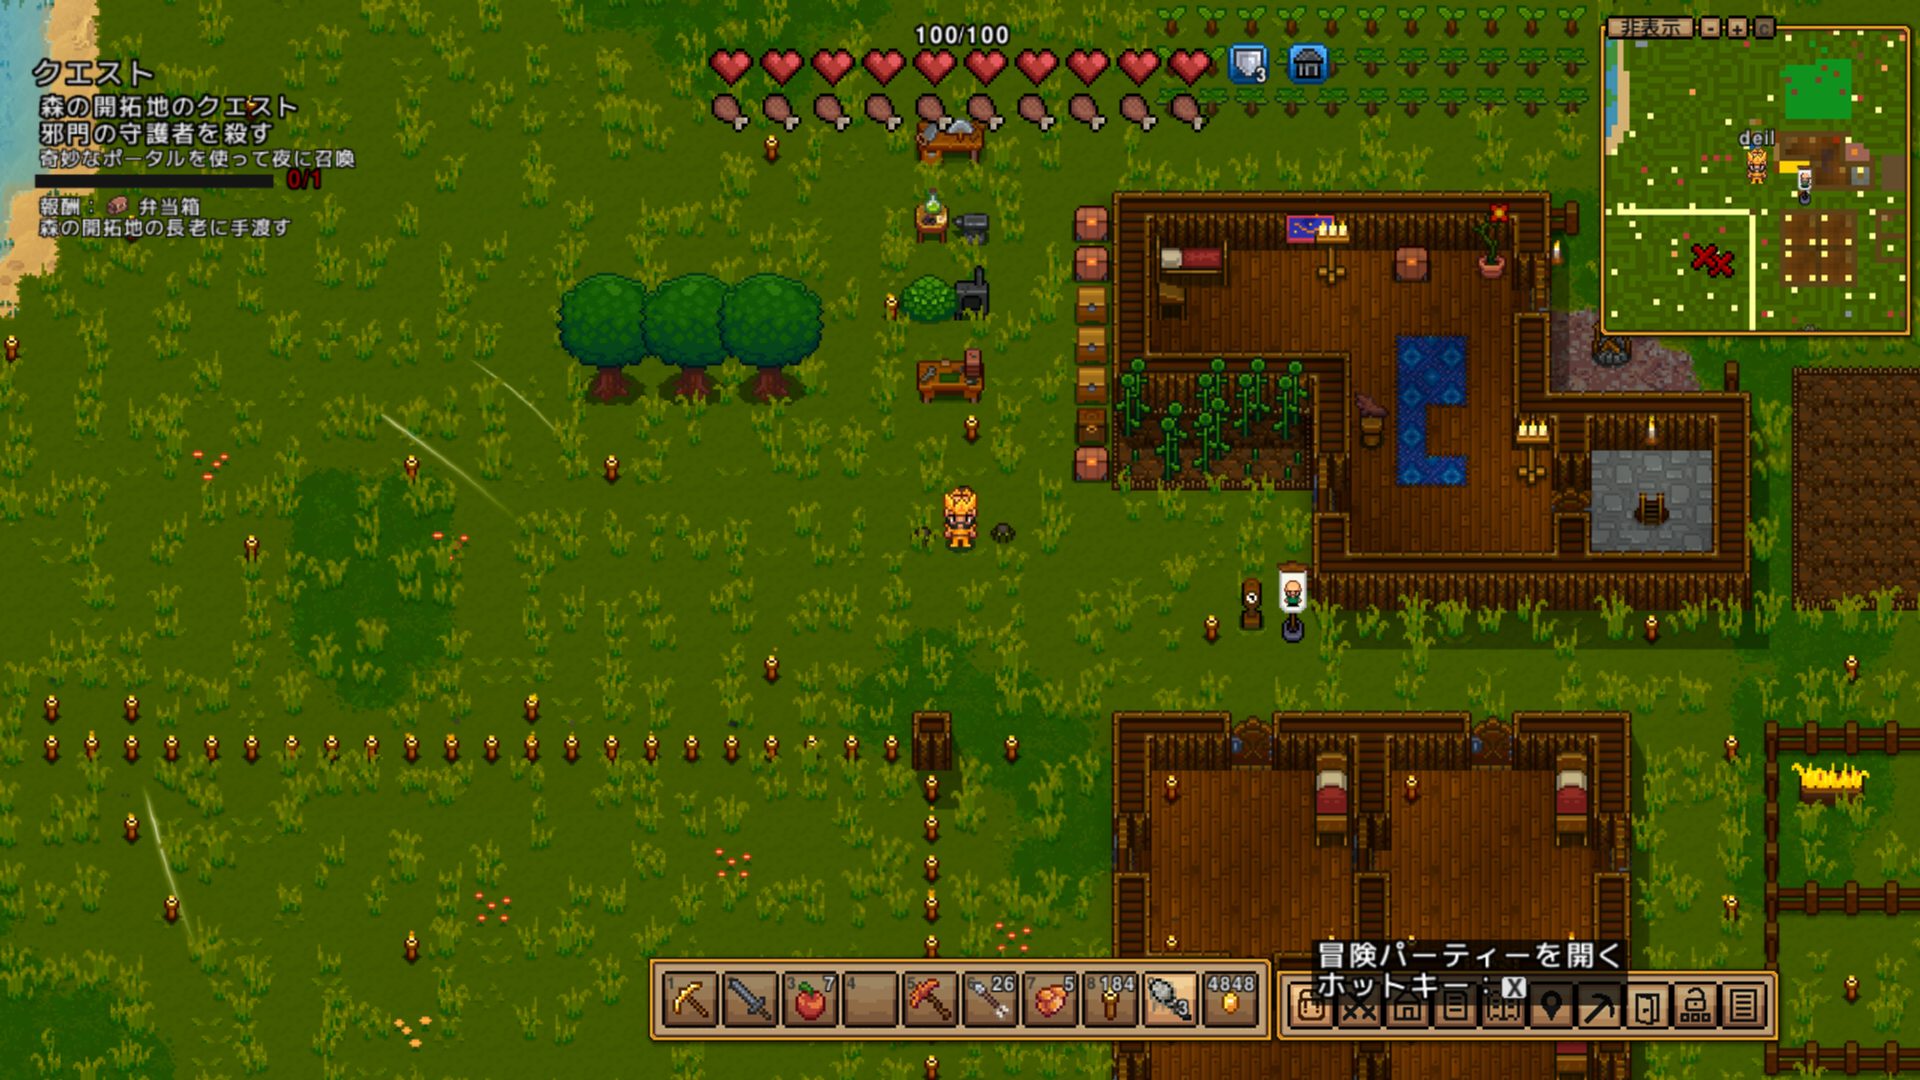
Building an Arena
This is the most important prep step. Evil’s Protector throws fireballs and homing projectiles constantly — you need open space to run.
What to do:
1. Clear a flat open area near your settlement (~30×30 tiles recommended)
2. Remove trees and rocks so you can sprint freely
3. Place torches around the perimeter — night fights are dark
You’ll probably expand your base into this area eventually anyway. Think of it as doing the clearing work early. Torches are cheap, so don’t skim.
Difficulty Scaling
| Difficulty | HP |
|---|---|
| Casual | 1,500 |
| Adventure | 2,500 |
| Classic | 3,000 |
| Hard | 3,500 |
| Brutal | 4,000 |
Damage reduction (armor value) is 10 on all difficulties — only HP changes.
Multiplayer: +80% HP per additional player. Three players on Classic pushes the boss to 7,800 HP.
Attack Patterns (4 Phases)
Evil’s Protector escalates as its HP drops. Here’s what each phase adds and how to deal with it.
Phase 1: 100%–75% HP (Ground — Basic Attacks)
What it does:
– Fires 3 fireballs in a spread pattern
– Places 2 portals that spawn Portal Minions
How to dodge:
The fireball spread is easy to slip through — gaps between shots get wider the farther you are. Keep mid-range and sidestep through the gaps.
Destroy portals immediately. Ignoring them lets Portal Minions stack until you’re overwhelmed. Clear the portals, then refocus on the boss.
Phase 2: 75% HP (Air Raid — Round 1)
What it does:
– Boss flies off-screen
– Red landing markers appear on the ground
– Bombs drop on the markers
How to dodge:
Move away from any red marker the instant it appears. Stay moving and you’ll naturally avoid them. Don’t stop.
Phase 3: 75%–50% HP (Ground — Homing Added)
What it does:
– Fireball spread continues
– New: purple homing projectiles (1–3 at a time)
– Homing shots track you for a while, then disappear on their own
How to dodge:
The homing shots are slow — just keep running and they won’t connect. The tricky part is dodging fireballs while simultaneously outrunning the homing shots. A wide arena is essential here.
A second air raid hits at 50% HP.
Phase 4: Below 50% HP (180° Fireball Spread + Full Assault)
What it does:
– Ground fireballs change to a 180° wide spray (instead of the 3-shot spread)
– Homing projectiles continue
– Below 25% HP: portals reappear and Portal Minion spawning resumes
– One more air raid mixed in
How to dodge:
Wider spacing from the boss = larger gaps between fireballs. Summoner build shines here — let your spiders work while you stay at max range and thread through the spread.
Below 25% HP is full chaos. Rotate through: clear portals → burst the boss → run from homing shots. Don’t hoard potions — use them.
My Strategy: Summoner Kite
Spider Staff → summon 3 spiders → run constantly → Iron Sword only on minions that close in. The spiders did consistent 7–11 damage each, three at a time, and the boss HP fell faster than expected. I even forgot to bring Health Potions and still won, which says a lot about the Summoner build’s stability.

Rewards
First Kill Only
| Item | Effect | |
|---|---|---|
| Demon Heart | Permanently increases max HP by +50 | |
| Demon Cloak | Permanently increases max Item Sets by +2 |
The Demon Heart is a one-per-playthrough item. Use it immediately — there’s no reason to hold onto it.
Every Kill
| Item | Effect | |
|---|---|---|
| Demonic Bar ×12 | Crafting material for Demonic Workstation and Demonic Anvil | |
| Force of Wind | Accessory — press the use button to dash forward |
Random Drop (1 of 4, 25% each)
| Item | Effect | |
|---|---|---|
| Melee Foci | Melee damage +20%, other damage −20% | |
| Range Foci | Ranged damage +20%, other damage −20% | |
| Magic Foci | Magic damage +20%, other damage −20% | |
| Summon Foci | Summon damage +20%, other damage −20% |
Equip the Foci that matches your build. If you don’t get the one you want, farm the boss — each kill is guaranteed to drop one.
What to Do After the Kill
1. Use the Demon Heart
Open your inventory and use the Demon Heart right away. It permanently boosts max HP by 50 and can only be used once. Don’t let it gather dust in a chest.
2. Craft the Demonic Workstation and Demonic Anvil
Put those 12 Demonic Bars to work. The Demonic Workstation and Demonic Anvil unlock the mid-game crafting tier and open up the next level of weapons and armor.
3. Equip Force of Wind
Slot Force of Wind in an accessory slot and use it to dash forward. It’s useful for dodging every boss fight from here on.
4. Head to the Next Boss
Evil’s Protector is down — two more Tier 1 bosses remain.
| Next Boss | Location |
|---|---|
| Queen Spider | Snow Biome underground |
| Void Wizard | Deepest floor of the Dungeon island |
Summary
- Get the Mysterious Portal from Forest cave chests or underground monsters — one run is usually enough
- Night only, flees at 6:30 AM — summon right after sunset
- Gold armor + Spider Staff (Summoner build) is stable and beginner-friendly
- Attacks escalate across 4 phases — the homing shots and 180° spread in the final phase are the real threats
- Destroy portals the moment they appear — minion stacking will overwhelm you
- First-kill rewards: Demon Heart (+50 max HP) and Demon Cloak (+2 item sets)
Boss Navigation
| Previous | Index | Next |
|---|---|---|
| (First Boss) | Complete Guide | Queen Spider → |
Published: 2026-03-14
Last updated: 2026-03-14
Test environment: Necesse v1.0 (PC), Classic difficulty, Solo